Text copied!
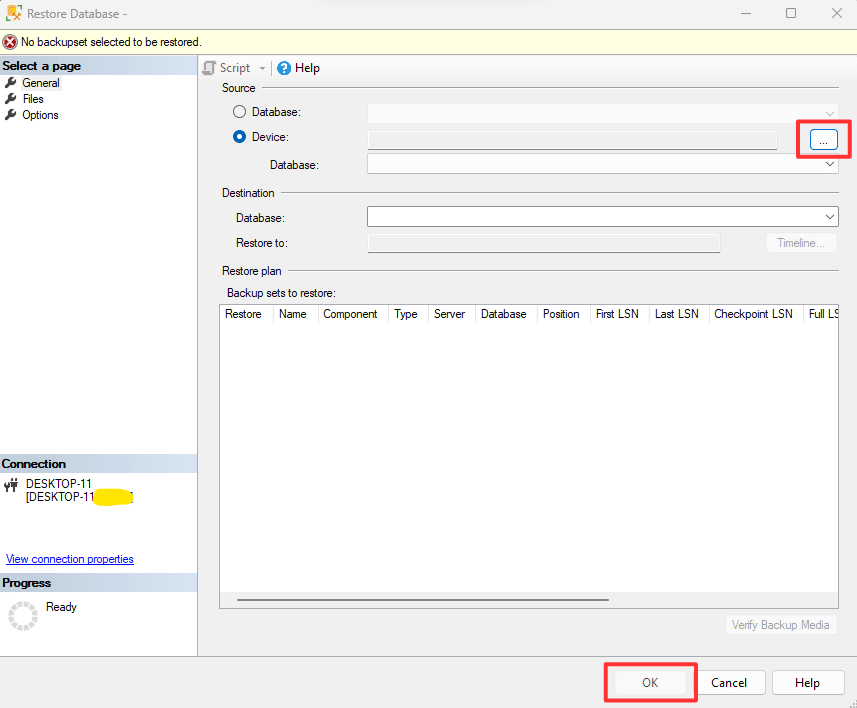
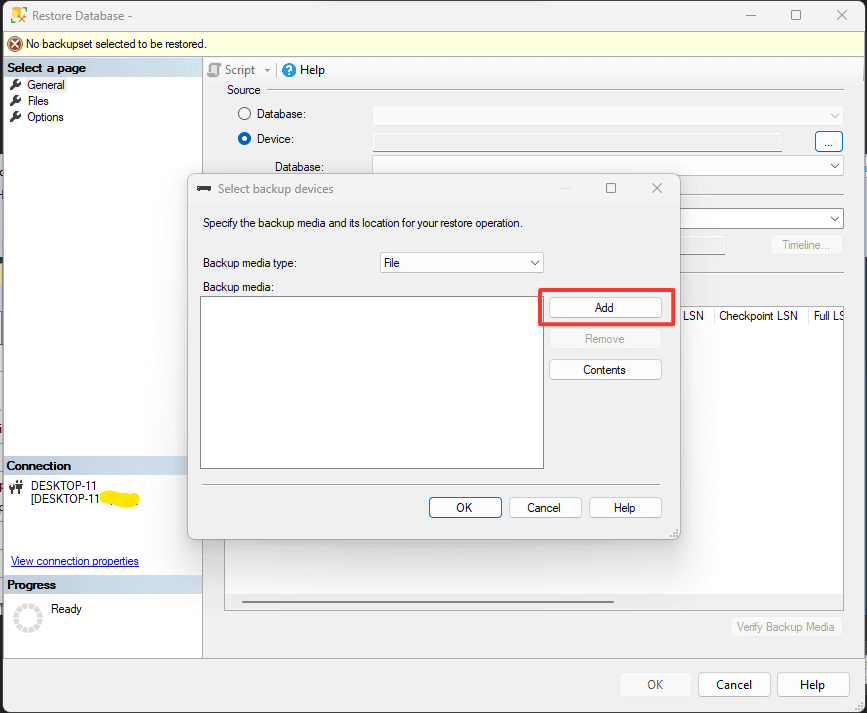
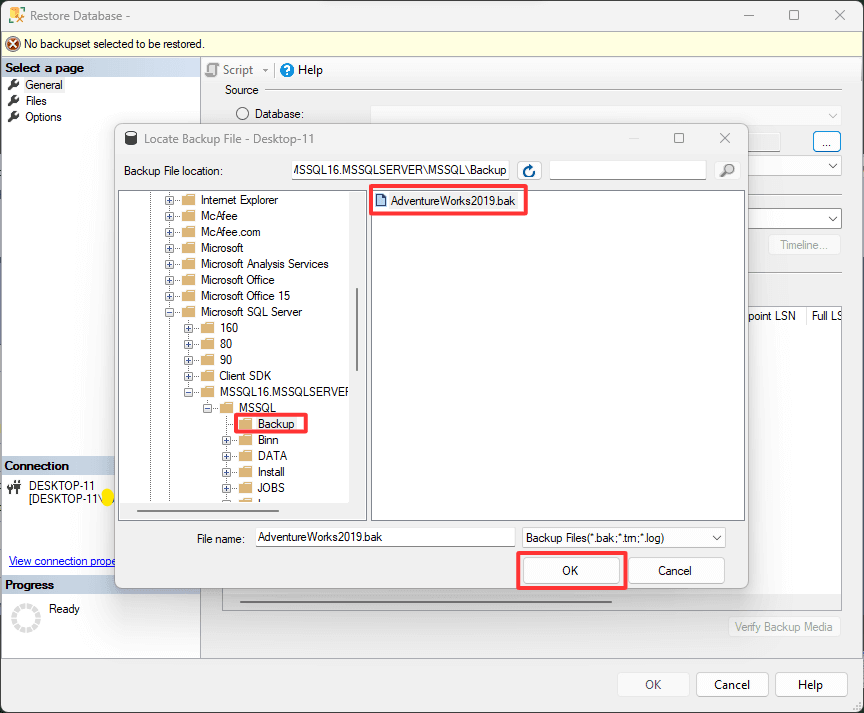
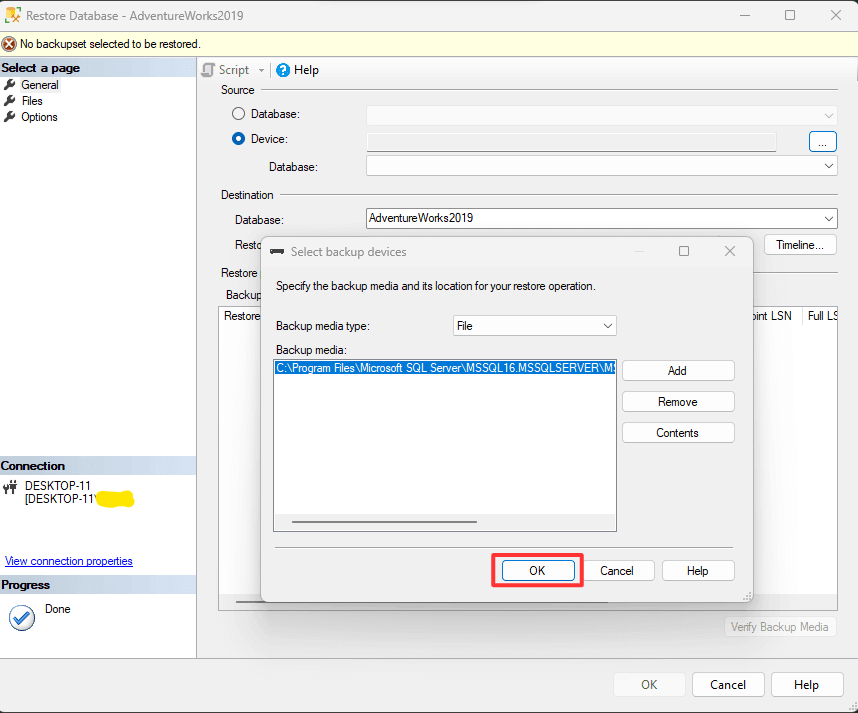
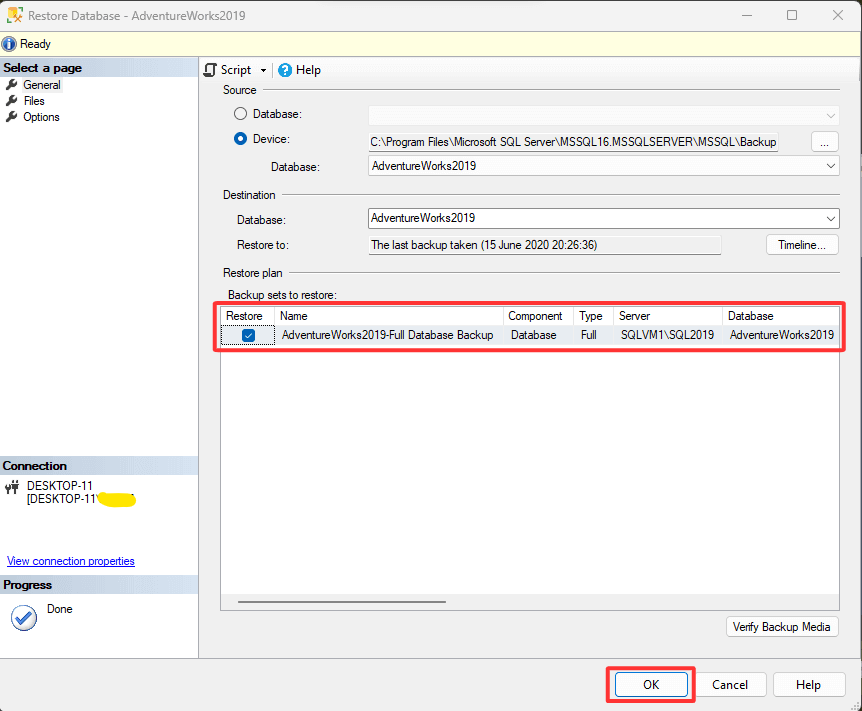
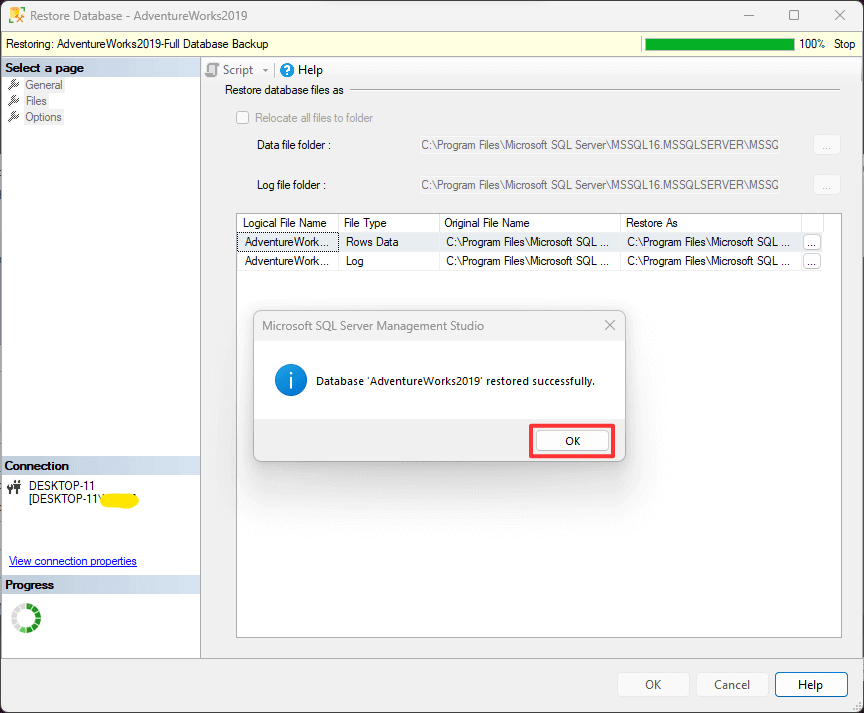
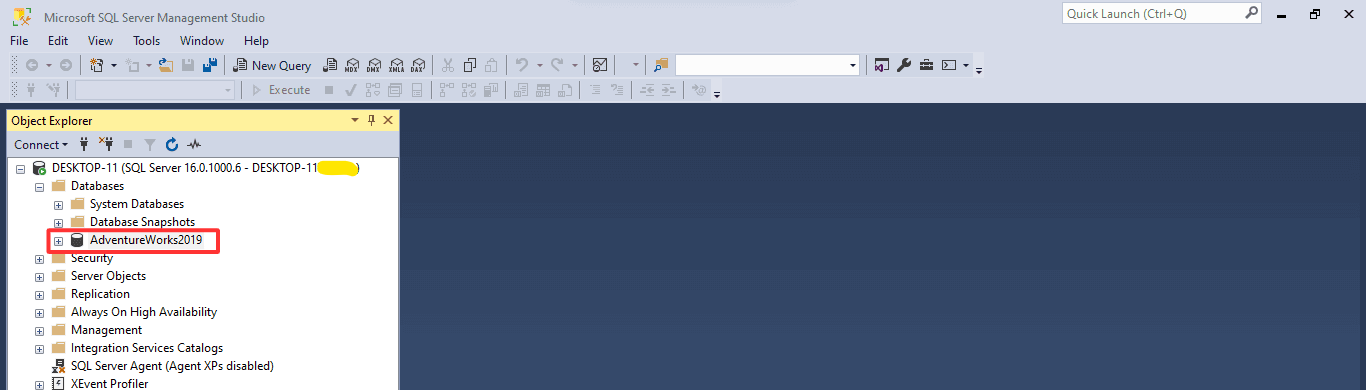
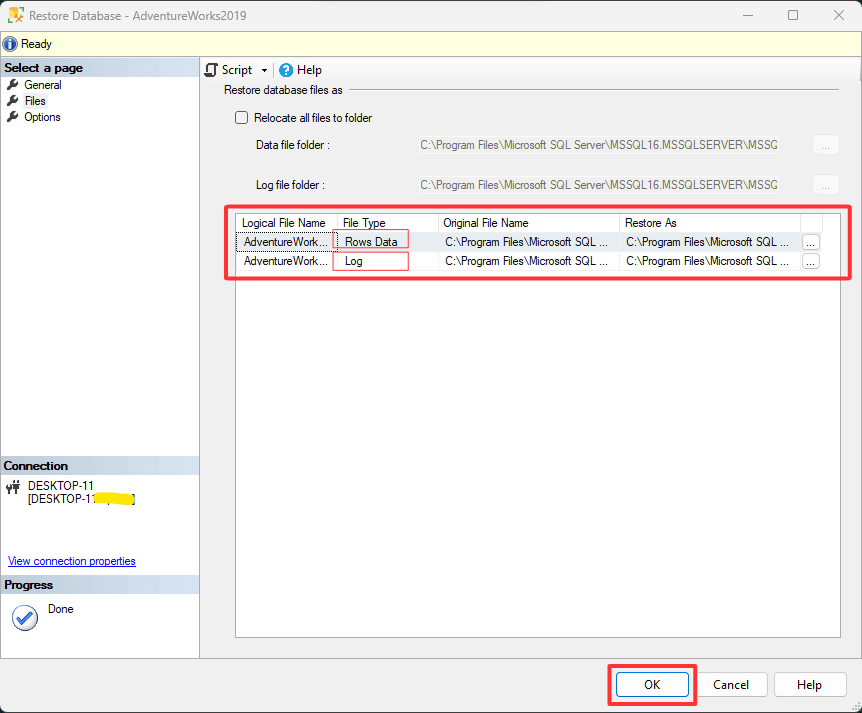
Restore Database: Strategic Playbook for Modern Businesses
Decision Context and Buyer Readiness
The strongest outcomes occur when teams align priorities across leadership, operations, and delivery partners. Establish ownership early: who owns outcomes, data quality, and release decisions. If your team is evaluating partnerships, define the decision criteria up front: time-to-value, security posture, integration readiness, and operational support after launch.
Partnership Model for High-Trust Delivery
Partnerships succeed when there is a shared execution cadence: weekly delivery reviews, monthly KPI checkpoints, and clear escalation paths for critical decisions. A good partner will propose phased releases that deliver value early and avoid overbuilding. This approach shortens risk windows and improves stakeholder confidence.
C:\Program Files\Microsoft SQL Server\MSSQL16.MSSQLSERVER\MSSQL\Backup

Partner Selection and Fit Checklist
For partnership searches, prioritize alignment on operating model, domain context, and data fluency. The right partner can translate business outcomes into measurable delivery scope without over-specifying features. Look for clear proof of execution: case studies that describe outcomes, transparent delivery rituals, and a plan for post-launch ownership.
RESTORE FILELISTONLY FROM DISK = N'C:\Program Files\Microsoft SQL
Server\MSSQL16.MSSQLSERVER\MSSQL\Backup\AdventureWorks2019.bak'

Delivery Blueprint: Discovery to Launch
Discovery should map workflow bottlenecks, data dependencies, and adoption constraints. Architecture decisions must align to those findings to avoid costly rework. Implementation should include explicit readiness checks for performance, data reliability, and user enablement before launch.
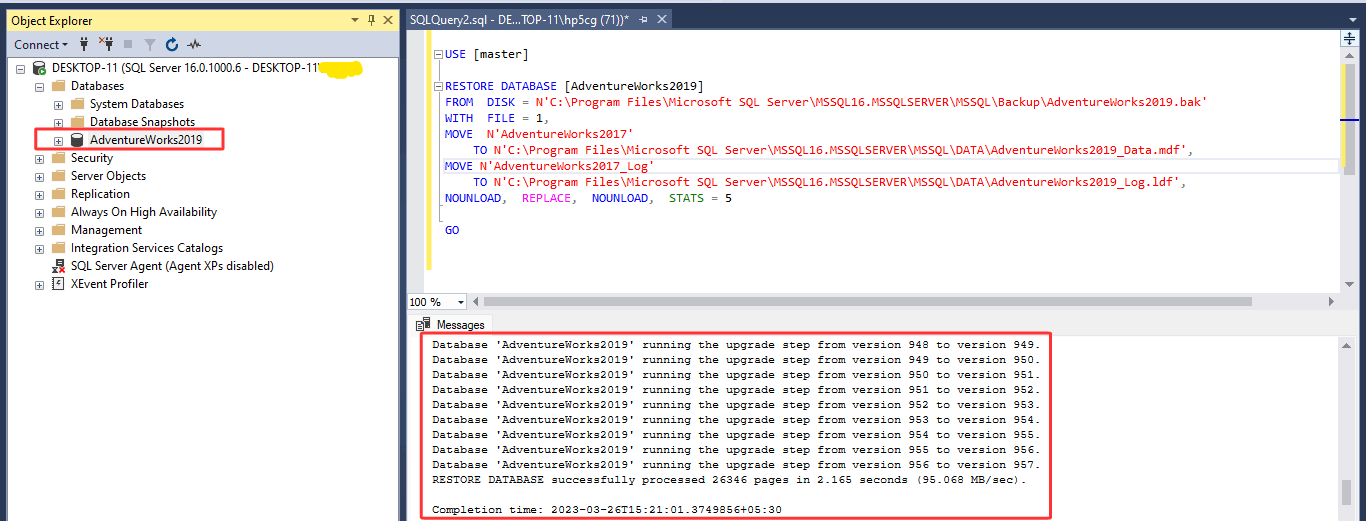
USE [master]

RESTORE DATABASE [AdventureWorks2019]
FROM  DISK = N'C:\Program Files\Microsoft SQL Server
\MSSQL16.MSSQLSERVER\MSSQL\Backup\AdventureWorks2019.bak'
WITH  FILE = 1,  NOUNLOAD,  STATS = 5
Risk, Security, and Governance
Leadership teams should define security and compliance guardrails at the start. Operational risk is reduced when data lineage, audit trails, and access controls are designed early.
KPI Design and ROI Tracking
Tie delivery milestones to KPIs that matter: cycle time reduction, conversion efficiency, data accuracy, and adoption depth. Use these metrics to justify ongoing investment.
Product Proof Points from SQLforGeeks
SQLforGeeks builds production platforms such as **ShopVo**, customizable ecommerce platform for branded storefronts with conversion-focused UX, and **GyManage**, gym management software for memberships, billing, trainer tracking, and operations automation. These products reflect real-world constraints and validate scalable delivery practices.
Next Step
Start with a discovery workshop that aligns objectives, risk constraints, and implementation milestones. This reduces ambiguity and creates a measurable path to value.
Additional Strategic Considerations
Strong delivery outcomes depend on clarity of ownership and disciplined communication. Weekly execution reviews should track blockers, while monthly operating reviews should evaluate KPI movement. Change management is critical: adoption falls when enablement is an afterthought. Treat training, documentation, and stakeholder alignment as part of the delivery scope. Strong delivery outcomes depend on clarity of ownership and disciplined communication. Weekly execution reviews should track blockers, while monthly operating reviews should evaluate KPI movement. Change management is critical: adoption falls when enablement is an afterthought. Treat training, documentation, and stakeholder alignment as part of the delivery scope. Strong delivery outcomes depend on clarity of ownership and disciplined communication. Weekly execution reviews should track blockers, while monthly operating reviews should evaluate KPI movement. Change management is critical: adoption falls when enablement is an afterthought. Treat training, documentation, and stakeholder alignment as part of the delivery scope. Strong delivery outcomes depend on clarity of ownership and disciplined communication. Weekly execution reviews should track blockers, while monthly operating reviews should evaluate KPI movement. Change management is critical: adoption falls when enablement is an afterthought. Treat training, documentation, and stakeholder alignment as part of the delivery scope. Strong delivery outcomes depend on clarity of ownership and disciplined communication. Weekly execution reviews should track blockers, while monthly operating reviews should evaluate KPI movement. Change management is critical: adoption falls when enablement is an afterthought. Treat training, documentation, and stakeholder alignment as part of the delivery scope. Strong delivery outcomes depend on clarity of ownership and disciplined communication. Weekly execution reviews should track blockers, while monthly operating reviews should evaluate KPI movement. Change management is critical: adoption falls when enablement is an afterthought. Treat training, documentation, and stakeholder alignment as part of the delivery scope. Strong delivery outcomes depend on clarity of ownership and disciplined communication. Weekly execution reviews should track blockers, while monthly operating reviews should evaluate KPI movement. Change management is critical: adoption falls when enablement is an afterthought. Treat training, documentation, and stakeholder alignment as part of the delivery scope. Strong delivery outcomes depend on clarity of ownership and disciplined communication. Weekly execution reviews should track blockers, while monthly operating reviews should evaluate KPI movement. Change management is critical: adoption falls when enablement is an afterthought. Treat training, documentation, and stakeholder alignment as part of the delivery scope. Strong delivery outcomes depend on clarity of ownership and disciplined communication. Weekly execution reviews should track blockers, while monthly operating reviews should evaluate KPI movement. Change management is critical: adoption falls when enablement is an afterthought. Treat training, documentation, and stakeholder alignment as part of the delivery scope. Strong delivery outcomes depend on clarity of ownership and disciplined communication. Weekly execution reviews should track blockers, while monthly operating reviews should evaluate KPI movement. Change management is critical: adoption falls when enablement is an afterthought. Treat training, documentation, and stakeholder alignment as part of the delivery scope. Strong delivery outcomes depend on clarity of ownership and disciplined communication. Weekly execution reviews should track blockers, while monthly operating reviews should evaluate KPI movement. Change management is critical: adoption falls when enablement is an afterthought. Treat training, documentation, and stakeholder alignment as part of the delivery scope. Strong delivery outcomes depend on clarity of ownership and disciplined communication. Weekly execution reviews should track blockers, while monthly operating reviews should evaluate KPI movement. Change management is critical: adoption falls when enablement is an afterthought. Treat training, documentation, and stakeholder alignment as part of the delivery scope. Strong delivery outcomes depend on clarity of ownership and disciplined communication. Weekly execution reviews should track blockers, while monthly operating reviews should evaluate KPI movement. Change management is critical: adoption falls when enablement is an afterthought. Treat training, documentation, and stakeholder alignment as part of the delivery scope. Strong delivery outcomes depend on clarity of ownership and disciplined communication. Weekly execution reviews should track blockers, while monthly operating reviews should evaluate KPI movement. Change management is critical: adoption falls when enablement is an afterthought. Treat training, documentation, and stakeholder alignment as part of the delivery scope. Strong delivery outcomes depend on clarity of ownership and disciplined communication. Weekly execution reviews should track blockers, while monthly operating reviews should evaluate KPI movement. Change management is critical: adoption falls when enablement is an afterthought. Treat training, documentation, and stakeholder alignment as part of the delivery scope.
Frequently Asked Questions
Start with measurable business outcomes: cycle time reduction, data reliability, and adoption within mission-critical workflows. Anchor scope to those outcomes.
A strong delivery partner brings execution cadence, domain-tested patterns, and governance discipline that keeps timelines predictable and scope aligned.
Phased releases tied to KPI milestones and clear ownership make delivery realistic. Avoid monolithic launches that delay value and raise risk.
Track operational KPIs (cycle time, error rates, adoption) and commercial KPIs (conversion, retention, margin). Combine both to quantify ROI.
RELATED :
Acid Properties In Dbms: Strategic Playbook for Modern Businesses
Alter Table: Strategic Playbook for Modern Businesses
Analytics Engineering Services For Businesses: 90-Day Execution Plan for Modern Businesses
Analytics Engineering Services For Businesses: Build vs Buy Analysis for Modern Businesses
Analytics Engineering Services For Businesses: Change Management Strategy for Modern Businesses
Analytics Engineering Services For Businesses: Enterprise Rollout Framework for Modern Businesses
Analytics Engineering Services For Businesses: Executive Decision Framework for Modern Businesses
Analytics Engineering Services For Businesses: Failure Patterns and Recovery for Modern Businesses
Analytics Engineering Services For Businesses: Implementation Blueprint for Modern Businesses
Analytics Engineering Services For Businesses: Integration Readiness Guide for Modern Businesses
Analytics Engineering Services For Businesses: KPI and Reporting Architecture for Modern Businesses
Analytics Engineering Services For Businesses: Leadership FAQ Guide for Modern Businesses
Analytics Engineering Services For Businesses: Product-Led Growth Lens for Modern Businesses
Analytics Engineering Services For Businesses: Risk Mitigation Playbook for Modern Businesses
Analytics Engineering Services For Businesses: Scalability Strategy for Modern Businesses
Analytics Engineering Services For Businesses: Security and Governance Model for Modern Businesses
Analytics Engineering Services For Businesses: Vendor Evaluation Checklist for Modern Businesses
Api Data Integration Services: 90-Day Execution Plan for Modern Businesses
Api Data Integration Services Architecture Due Diligence: Strategic Playbook for Modern Businesses
Api Data Integration Services: Build vs Buy Analysis for Modern Businesses
Api Data Integration Services: Change Management Strategy for Modern Businesses
Api Data Integration Services: Cost, Timeline, and ROI Playbook for Modern Businesses
Api Data Integration Services: Enterprise Rollout Framework for Modern Businesses
Api Data Integration Services: Executive Decision Framework for Modern Businesses
Api Data Integration Services: Failure Patterns and Recovery for Modern Businesses
Api Data Integration Services: Implementation Blueprint for Modern Businesses
Api Data Integration Services: Integration Readiness Guide for Modern Businesses
Api Data Integration Services: KPI and Reporting Architecture for Modern Businesses
Api Data Integration Services: Leadership FAQ Guide for Modern Businesses
Api Data Integration Services Operational Excellence Model: Strategic Playbook for Modern Businesses
Api Data Integration Services Procurement Strategy Brief: Strategic Playbook for Modern Businesses
Api Data Integration Services: Product-Led Growth Lens for Modern Businesses
Api Data Integration Services: Risk Mitigation Playbook for Modern Businesses
Api Data Integration Services: Scalability Strategy for Modern Businesses
Api Data Integration Services: Security and Governance Model for Modern Businesses
Api Data Integration Services: Vendor Evaluation Checklist for Modern Businesses
Api Integration And Automation Services: 90-Day Execution Plan for Modern Businesses
Api Integration And Automation Services: Build vs Buy Analysis for Modern Businesses
Api Integration And Automation Services: Change Management Strategy for Modern Businesses
Api Integration And Automation Services: Cost, Timeline, and ROI Playbook for Modern Businesses
Api Integration And Automation Services: Enterprise Rollout Framework for Modern Businesses
Api Integration And Automation Services: Executive Decision Framework for Modern Businesses
Api Integration And Automation Services: Failure Patterns and Recovery for Modern Businesses
Api Integration And Automation Services: Implementation Blueprint for Modern Businesses
Api Integration And Automation Services: Integration Readiness Guide for Modern Businesses
Api Integration And Automation Services: KPI and Reporting Architecture for Modern Businesses
Api Integration And Automation Services: Leadership FAQ Guide for Modern Businesses
Api Integration And Automation Services: Product-Led Growth Lens for Modern Businesses
Api Integration And Automation Services: Scalability Strategy for Modern Businesses
Api Integration And Automation Services: Security and Governance Model for Modern Businesses
Api Integration And Automation Services: Vendor Evaluation Checklist for Modern Businesses
Attach Database: Strategic Playbook for Modern Businesses
Backend Systems For Scalable Products: 90-Day Execution Plan for Modern Businesses
Backend Systems For Scalable Products: Build vs Buy Analysis for Modern Businesses
Backend Systems For Scalable Products: Change Management Strategy for Modern Businesses
Backend Systems For Scalable Products: Cost, Timeline, and ROI Playbook for Modern Businesses
Backend Systems For Scalable Products: Enterprise Rollout Framework for Modern Businesses
Backend Systems For Scalable Products: Executive Decision Framework for Modern Businesses
Backend Systems For Scalable Products: Failure Patterns and Recovery for Modern Businesses
Backend Systems For Scalable Products: Implementation Blueprint for Modern Businesses
Backend Systems For Scalable Products: Integration Readiness Guide for Modern Businesses
Backend Systems For Scalable Products: KPI and Reporting Architecture for Modern Businesses
Backend Systems For Scalable Products: Leadership FAQ Guide for Modern Businesses
Backend Systems For Scalable Products: Product-Led Growth Lens for Modern Businesses
Backend Systems For Scalable Products: Scalability Strategy for Modern Businesses
Backend Systems For Scalable Products: Security and Governance Model for Modern Businesses
Backend Systems For Scalable Products: Vendor Evaluation Checklist for Modern Businesses
Backup Database: Strategic Playbook for Modern Businesses
Batch And Real Time Data Pipeline Engineering: 90-Day Execution Plan for Modern Businesses
Batch And Real Time Data Pipeline Engineering: Build vs Buy Analysis for Modern Businesses
Batch And Real Time Data Pipeline Engineering: Change Management Strategy for Modern Businesses
Batch And Real Time Data Pipeline Engineering: Enterprise Rollout Framework for Modern Businesses
Batch And Real Time Data Pipeline Engineering: Executive Decision Framework for Modern Businesses
Batch And Real Time Data Pipeline Engineering: Failure Patterns and Recovery for Modern Businesses
Batch And Real Time Data Pipeline Engineering: Implementation Blueprint for Modern Businesses
Batch And Real Time Data Pipeline Engineering: Integration Readiness Guide for Modern Businesses
Batch And Real Time Data Pipeline Engineering: KPI and Reporting Architecture for Modern Businesses
Batch And Real Time Data Pipeline Engineering: Leadership FAQ Guide for Modern Businesses
Batch And Real Time Data Pipeline Engineering: Product-Led Growth Lens for Modern Businesses
Batch And Real Time Data Pipeline Engineering: Risk Mitigation Playbook for Modern Businesses
Batch And Real Time Data Pipeline Engineering: Scalability Strategy for Modern Businesses
Batch And Real Time Data Pipeline Engineering: Security and Governance Model for Modern Businesses
Batch And Real Time Data Pipeline Engineering: Vendor Evaluation Checklist for Modern Businesses
Bespoke Software Development For Businesses: 90-Day Execution Plan for Modern Businesses
Bespoke Software Development For Businesses: Build vs Buy Analysis for Modern Businesses
Bespoke Software Development For Businesses: Change Management Strategy for Modern Businesses
Bespoke Software Development For Businesses: Cost, Timeline, and ROI Playbook for Modern Businesses
Bespoke Software Development For Businesses: Enterprise Rollout Framework for Modern Businesses
Bespoke Software Development For Businesses: Executive Decision Framework for Modern Businesses
Bespoke Software Development For Businesses: Failure Patterns and Recovery for Modern Businesses
Bespoke Software Development For Businesses: Implementation Blueprint for Modern Businesses
Bespoke Software Development For Businesses: Integration Readiness Guide for Modern Businesses
Bespoke Software Development For Businesses: KPI and Reporting Architecture for Modern Businesses
Bespoke Software Development For Businesses: Leadership FAQ Guide for Modern Businesses
Bespoke Software Development For Businesses: Product-Led Growth Lens for Modern Businesses
Bespoke Software Development For Businesses: Risk Mitigation Playbook for Modern Businesses
Bespoke Software Development For Businesses: Scalability Strategy for Modern Businesses
Bespoke Software Development For Businesses: Security and Governance Model for Modern Businesses
Bespoke Software Development For Businesses: Vendor Evaluation Checklist for Modern Businesses
Between Operator: Strategic Playbook for Modern Businesses
Business Intelligence Dashboard Solutions: 90-Day Execution Plan for Modern Businesses
Business Intelligence Dashboard Solutions: 90-Day Execution Plan for Modern Businesses
Business Intelligence Dashboard Solutions: Build vs Buy Analysis for Modern Businesses
Business Intelligence Dashboard Solutions: Build vs Buy Analysis for Modern Businesses
Business Intelligence Dashboard Solutions: Change Management Strategy for Modern Businesses
Business Intelligence Dashboard Solutions: Change Management Strategy for Modern Businesses
Business Intelligence Dashboard Solutions: Cost, Timeline, and ROI Playbook for Modern Businesses
Business Intelligence Dashboard Solutions: Cost, Timeline, and ROI Playbook for Modern Businesses
Business Intelligence Dashboard Solutions: Enterprise Rollout Framework for Modern Businesses
Business Intelligence Dashboard Solutions: Enterprise Rollout Framework for Modern Businesses
Business Intelligence Dashboard Solutions: Executive Decision Framework for Modern Businesses
Business Intelligence Dashboard Solutions: Executive Decision Framework for Modern Businesses
Business Intelligence Dashboard Solutions: Failure Patterns and Recovery for Modern Businesses
Business Intelligence Dashboard Solutions: Failure Patterns and Recovery for Modern Businesses
Business Intelligence Dashboard Solutions: Implementation Blueprint for Modern Businesses
Business Intelligence Dashboard Solutions: Implementation Blueprint for Modern Businesses
Business Intelligence Dashboard Solutions: Integration Readiness Guide for Modern Businesses
Business Intelligence Dashboard Solutions: Integration Readiness Guide for Modern Businesses
Business Intelligence Dashboard Solutions: KPI and Reporting Architecture for Modern Businesses
Business Intelligence Dashboard Solutions: KPI and Reporting Architecture for Modern Businesses
Business Intelligence Dashboard Solutions: Leadership FAQ Guide for Modern Businesses
Business Intelligence Dashboard Solutions: Leadership FAQ Guide for Modern Businesses
Business Intelligence Dashboard Solutions: Product-Led Growth Lens for Modern Businesses
Business Intelligence Dashboard Solutions: Product-Led Growth Lens for Modern Businesses
Business Intelligence Dashboard Solutions: Risk Mitigation Playbook for Modern Businesses
Business Intelligence Dashboard Solutions: Scalability Strategy for Modern Businesses
Business Intelligence Dashboard Solutions: Scalability Strategy for Modern Businesses
Business Intelligence Dashboard Solutions: Security and Governance Model for Modern Businesses
Business Intelligence Dashboard Solutions: Security and Governance Model for Modern Businesses
Business Intelligence Dashboard Solutions: Vendor Evaluation Checklist for Modern Businesses
Business Intelligence Dashboard Solutions: Vendor Evaluation Checklist for Modern Businesses
Business Intelligence Dashboards For Companies: Strategic Playbook for Modern Businesses
Business Intelligence Dashboards For Companies: Strategic Playbook for Modern Businesses
Business Intelligence Dashboards For Companies: Strategic Playbook for Modern Businesses
Business Intelligence Dashboards For Companies: Strategic Playbook for Modern Businesses
Business Intelligence Dashboards For Companies: Strategic Playbook for Modern Businesses
Business Intelligence Dashboards For Companies: Strategic Playbook for Modern Businesses
Business Intelligence Dashboards For Companies: Strategic Playbook for Modern Businesses
Business Intelligence Dashboards For Companies: Strategic Playbook for Modern Businesses
Business Intelligence Dashboards For Companies: Strategic Playbook for Modern Businesses
Business Intelligence Dashboards For Companies: Strategic Playbook for Modern Businesses
Cloud Data Warehouse Development: 90-Day Execution Plan for Modern Businesses
Cloud Data Warehouse Development: Build vs Buy Analysis for Modern Businesses
Cloud Data Warehouse Development: Change Management Strategy for Modern Businesses
Cloud Data Warehouse Development: Cost, Timeline, and ROI Playbook for Modern Businesses
Cloud Data Warehouse Development: Enterprise Rollout Framework for Modern Businesses
Cloud Data Warehouse Development: Executive Decision Framework for Modern Businesses
Cloud Data Warehouse Development: Failure Patterns and Recovery for Modern Businesses
Cloud Data Warehouse Development: Implementation Blueprint for Modern Businesses
Cloud Data Warehouse Development: Integration Readiness Guide for Modern Businesses
Cloud Data Warehouse Development: KPI and Reporting Architecture for Modern Businesses
Cloud Data Warehouse Development: Leadership FAQ Guide for Modern Businesses
Cloud Data Warehouse Development: Product-Led Growth Lens for Modern Businesses
Cloud Data Warehouse Development: Risk Mitigation Playbook for Modern Businesses
Cloud Data Warehouse Development: Scalability Strategy for Modern Businesses
Cloud Data Warehouse Development: Security and Governance Model for Modern Businesses
Cloud Data Warehouse Development: Vendor Evaluation Checklist for Modern Businesses
Corporate Web Platform Development Services: 90-Day Execution Plan for Modern Businesses
Corporate Web Platform Development Services: Build vs Buy Analysis for Modern Businesses
Corporate Web Platform Development Services: Change Management Strategy for Modern Businesses
Corporate Web Platform Development Services: Cost, Timeline, and ROI Playbook for Modern Businesses
Corporate Web Platform Development Services: Enterprise Rollout Framework for Modern Businesses
Corporate Web Platform Development Services: Executive Decision Framework for Modern Businesses
Corporate Web Platform Development Services: Failure Patterns and Recovery for Modern Businesses
Corporate Web Platform Development Services: Implementation Blueprint for Modern Businesses
Corporate Web Platform Development Services: Integration Readiness Guide for Modern Businesses
Corporate Web Platform Development Services: KPI and Reporting Architecture for Modern Businesses
Corporate Web Platform Development Services: Leadership FAQ Guide for Modern Businesses
Corporate Web Platform Development Services: Product-Led Growth Lens for Modern Businesses
Corporate Web Platform Development Services: Risk Mitigation Playbook for Modern Businesses
Corporate Web Platform Development Services: Scalability Strategy for Modern Businesses
Corporate Web Platform Development Services: Security and Governance Model for Modern Businesses
Corporate Web Platform Development Services: Vendor Evaluation Checklist for Modern Businesses
Create Database: Strategic Playbook for Modern Businesses
Create Table: Strategic Playbook for Modern Businesses
Cricket Auction Software: 90-Day Execution Plan for Modern Businesses
Cricket Auction Software: Build vs Buy Analysis for Modern Businesses
Cricket Auction Software: Change Management Strategy for Modern Businesses
Cricket Auction Software: Cost, Timeline, and ROI Playbook for Modern Businesses
Cricket Auction Software: Enterprise Rollout Framework for Modern Businesses
Cricket Auction Software: Executive Decision Framework for Modern Businesses
Cricket Auction Software: Failure Patterns and Recovery for Modern Businesses
Cricket Auction Software: Implementation Blueprint for Modern Businesses
Cricket Auction Software: Integration Readiness Guide for Modern Businesses
Cricket Auction Software: KPI and Reporting Architecture for Modern Businesses
Cricket Auction Software: Leadership FAQ Guide for Modern Businesses
Cricket Auction Software Platform: 90-Day Execution Plan for Modern Businesses
Cricket Auction Software Platform: Build vs Buy Analysis for Modern Businesses
Cricket Auction Software Platform: Change Management Strategy for Modern Businesses
Cricket Auction Software Platform: Cost, Timeline, and ROI Playbook for Modern Businesses
Cricket Auction Software Platform: Enterprise Rollout Framework for Modern Businesses
Cricket Auction Software Platform: Executive Decision Framework for Modern Businesses
Cricket Auction Software Platform: Failure Patterns and Recovery for Modern Businesses
Cricket Auction Software Platform: Implementation Blueprint for Modern Businesses
Cricket Auction Software Platform: Integration Readiness Guide for Modern Businesses
Cricket Auction Software Platform: KPI and Reporting Architecture for Modern Businesses
Cricket Auction Software Platform: Leadership FAQ Guide for Modern Businesses
Cricket Auction Software Platform: Product-Led Growth Lens for Modern Businesses
Cricket Auction Software Platform: Risk Mitigation Playbook for Modern Businesses
Cricket Auction Software Platform: Scalability Strategy for Modern Businesses
Cricket Auction Software Platform: Security and Governance Model for Modern Businesses
Cricket Auction Software Platform: Vendor Evaluation Checklist for Modern Businesses
Cricket Auction Software: Product-Led Growth Lens for Modern Businesses
Cricket Auction Software: Scalability Strategy for Modern Businesses
Cricket Auction Software: Security and Governance Model for Modern Businesses
Cricket Auction Software: Vendor Evaluation Checklist for Modern Businesses
Cricket Tournament Management Software: 90-Day Execution Plan for Modern Businesses
Cricket Tournament Management Software: Build vs Buy Analysis for Modern Businesses
Cricket Tournament Management Software: Change Management Strategy for Modern Businesses
Cricket Tournament Management Software: Cost, Timeline, and ROI Playbook for Modern Businesses
Cricket Tournament Management Software: Enterprise Rollout Framework for Modern Businesses
Cricket Tournament Management Software: Executive Decision Framework for Modern Businesses
Cricket Tournament Management Software: Failure Patterns and Recovery for Modern Businesses
Cricket Tournament Management Software: Implementation Blueprint for Modern Businesses
Cricket Tournament Management Software: Integration Readiness Guide for Modern Businesses
Cricket Tournament Management Software: KPI and Reporting Architecture for Modern Businesses
Cricket Tournament Management Software: Leadership FAQ Guide for Modern Businesses
Cricket Tournament Management Software: Product-Led Growth Lens for Modern Businesses
Cricket Tournament Management Software: Risk Mitigation Playbook for Modern Businesses
Cricket Tournament Management Software: Scalability Strategy for Modern Businesses
Cricket Tournament Management Software: Security and Governance Model for Modern Businesses
Cricket Tournament Management Software: Vendor Evaluation Checklist for Modern Businesses
Cricket Tournament Management System: 90-Day Execution Plan for Modern Businesses
Cricket Tournament Management System: Build vs Buy Analysis for Modern Businesses
Cricket Tournament Management System: Change Management Strategy for Modern Businesses
Cricket Tournament Management System: Cost, Timeline, and ROI Playbook for Modern Businesses
Cricket Tournament Management System: Enterprise Rollout Framework for Modern Businesses
Cricket Tournament Management System: Executive Decision Framework for Modern Businesses
Cricket Tournament Management System: Failure Patterns and Recovery for Modern Businesses
Cricket Tournament Management System: Implementation Blueprint for Modern Businesses
Cricket Tournament Management System: Integration Readiness Guide for Modern Businesses
Cricket Tournament Management System: KPI and Reporting Architecture for Modern Businesses
Cricket Tournament Management System: Leadership FAQ Guide for Modern Businesses
Cricket Tournament Management System: Product-Led Growth Lens for Modern Businesses
Cricket Tournament Management System: Scalability Strategy for Modern Businesses
Cricket Tournament Management System: Security and Governance Model for Modern Businesses
Cricket Tournament Management System: Vendor Evaluation Checklist for Modern Businesses
Sql Cross Join: Strategic Playbook for Modern Businesses
Custom Business Application Development: 90-Day Execution Plan for Modern Businesses
Custom Business Application Development: Build vs Buy Analysis for Modern Businesses
Custom Business Application Development: Change Management Strategy for Modern Businesses
Custom Business Application Development: Cost, Timeline, and ROI Playbook for Modern Businesses
Custom Business Application Development: Enterprise Rollout Framework for Modern Businesses
Custom Business Application Development: Executive Decision Framework for Modern Businesses
Custom Business Application Development: Failure Patterns and Recovery for Modern Businesses
Custom Business Application Development: Implementation Blueprint for Modern Businesses
Custom Business Application Development: Integration Readiness Guide for Modern Businesses
Custom Business Application Development: KPI and Reporting Architecture for Modern Businesses
Custom Business Application Development: Leadership FAQ Guide for Modern Businesses
Custom Business Application Development: Product-Led Growth Lens for Modern Businesses
Custom Business Application Development: Scalability Strategy for Modern Businesses
Custom Business Application Development: Security and Governance Model for Modern Businesses
Custom Business Application Development: Vendor Evaluation Checklist for Modern Businesses
Custom Business Software Solutions: 90-Day Execution Plan for Modern Businesses
Custom Business Software Solutions: Build vs Buy Analysis for Modern Businesses
Custom Business Software Solutions: Change Management Strategy for Modern Businesses
Custom Business Software Solutions: Cost, Timeline, and ROI Playbook for Modern Businesses
Custom Business Software Solutions: Enterprise Rollout Framework for Modern Businesses
Custom Business Software Solutions: Executive Decision Framework for Modern Businesses
Custom Business Software Solutions: Failure Patterns and Recovery for Modern Businesses
Custom Business Software Solutions: Implementation Blueprint for Modern Businesses
Custom Business Software Solutions: Integration Readiness Guide for Modern Businesses
Custom Business Software Solutions: KPI and Reporting Architecture for Modern Businesses
Custom Business Software Solutions: Leadership FAQ Guide for Modern Businesses
Custom Business Software Solutions: Product-Led Growth Lens for Modern Businesses
Custom Business Software Solutions: Risk Mitigation Playbook for Modern Businesses
Custom Business Software Solutions: Scalability Strategy for Modern Businesses
Custom Business Software Solutions: Security and Governance Model for Modern Businesses
Custom Business Software Solutions: Vendor Evaluation Checklist for Modern Businesses
Custom Ecommerce Platform Development: 90-Day Execution Plan for Modern Businesses
Custom Ecommerce Platform Development: 90-Day Execution Plan for Modern Businesses
Custom Ecommerce Platform Development: Build vs Buy Analysis for Modern Businesses
Custom Ecommerce Platform Development: Build vs Buy Analysis for Modern Businesses
Custom Ecommerce Platform Development: Change Management Strategy for Modern Businesses
Custom Ecommerce Platform Development: Change Management Strategy for Modern Businesses
Custom Ecommerce Platform Development: Cost, Timeline, and ROI Playbook for Modern Businesses
Custom Ecommerce Platform Development: Cost, Timeline, and ROI Playbook for Modern Businesses
Custom Ecommerce Platform Development: Enterprise Rollout Framework for Modern Businesses
Custom Ecommerce Platform Development: Enterprise Rollout Framework for Modern Businesses
Custom Ecommerce Platform Development: Executive Decision Framework for Modern Businesses
Custom Ecommerce Platform Development: Executive Decision Framework for Modern Businesses
Custom Ecommerce Platform Development: Failure Patterns and Recovery for Modern Businesses
Custom Ecommerce Platform Development: Failure Patterns and Recovery for Modern Businesses
Custom Ecommerce Platform Development: Implementation Blueprint for Modern Businesses
Custom Ecommerce Platform Development: Implementation Blueprint for Modern Businesses
Custom Ecommerce Platform Development: Integration Readiness Guide for Modern Businesses
Custom Ecommerce Platform Development: Integration Readiness Guide for Modern Businesses
Custom Ecommerce Platform Development: KPI and Reporting Architecture for Modern Businesses
Custom Ecommerce Platform Development: KPI and Reporting Architecture for Modern Businesses
Custom Ecommerce Platform Development: Leadership FAQ Guide for Modern Businesses
Custom Ecommerce Platform Development: Leadership FAQ Guide for Modern Businesses
Custom Ecommerce Platform Development: Product-Led Growth Lens for Modern Businesses
Custom Ecommerce Platform Development: Product-Led Growth Lens for Modern Businesses
Custom Ecommerce Platform Development: Risk Mitigation Playbook for Modern Businesses
Custom Ecommerce Platform Development: Scalability Strategy for Modern Businesses
Custom Ecommerce Platform Development: Scalability Strategy for Modern Businesses
Custom Ecommerce Platform Development: Security and Governance Model for Modern Businesses
Custom Ecommerce Platform Development: Security and Governance Model for Modern Businesses
Custom Ecommerce Platform Development: Vendor Evaluation Checklist for Modern Businesses
Custom Ecommerce Platform Development: Vendor Evaluation Checklist for Modern Businesses
Custom Software Development Company: 90-Day Execution Plan for Modern Businesses
Custom Software Development Company: 90-Day Execution Plan for Modern Businesses
Custom Software Development Company: Build vs Buy Analysis for Modern Businesses
Custom Software Development Company: Build vs Buy Analysis for Modern Businesses
Custom Software Development Company: Strategic Playbook for Modern Businesses
Custom Software Development Company: Change Management Strategy for Modern Businesses
Custom Software Development Company: Change Management Strategy for Modern Businesses
Custom Software Development Company: Strategic Playbook for Modern Businesses
Custom Software Development Company: Strategic Playbook for Modern Businesses
Custom Software Development Company: Cost, Timeline, and ROI Playbook for Modern Businesses
Custom Software Development Company: Cost, Timeline, and ROI Playbook for Modern Businesses
Custom Software Development Company: Enterprise Rollout Framework for Modern Businesses
Custom Software Development Company: Enterprise Rollout Framework for Modern Businesses
Custom Software Development Company: Strategic Playbook for Modern Businesses
Custom Software Development Company: Executive Decision Framework for Modern Businesses
Custom Software Development Company: Executive Decision Framework for Modern Businesses
Custom Software Development Company: Failure Patterns and Recovery for Modern Businesses
Custom Software Development Company: Failure Patterns and Recovery for Modern Businesses
Custom Software Development Company: Strategic Playbook for Modern Businesses
Custom Software Development Company: Implementation Blueprint for Modern Businesses
Custom Software Development Company: Implementation Blueprint for Modern Businesses
Custom Software Development Company: Strategic Playbook for Modern Businesses
Custom Software Development Company: Integration Readiness Guide for Modern Businesses
Custom Software Development Company: Integration Readiness Guide for Modern Businesses
Custom Software Development Company: KPI and Reporting Architecture for Modern Businesses
Custom Software Development Company: KPI and Reporting Architecture for Modern Businesses
Custom Software Development Company: Strategic Playbook for Modern Businesses
Custom Software Development Company: Leadership FAQ Guide for Modern Businesses
Custom Software Development Company: Leadership FAQ Guide for Modern Businesses
Custom Software Development Company: Product-Led Growth Lens for Modern Businesses
Custom Software Development Company: Product-Led Growth Lens for Modern Businesses
Custom Software Development Company: Risk Mitigation Playbook for Modern Businesses
Custom Software Development Company: Scalability Strategy for Modern Businesses
Custom Software Development Company: Scalability Strategy for Modern Businesses
Custom Software Development Company: Strategic Playbook for Modern Businesses
Custom Software Development Company: Strategic Playbook for Modern Businesses
Custom Software Development Company: Security and Governance Model for Modern Businesses
Custom Software Development Company: Security and Governance Model for Modern Businesses
Custom Software Development Company: Strategic Playbook for Modern Businesses
Custom Software Development Company: Vendor Evaluation Checklist for Modern Businesses
Custom Software Development Company: Vendor Evaluation Checklist for Modern Businesses
Custom Software Development Services: 90-Day Execution Plan for Modern Businesses
Custom Software Development Services: Build vs Buy Analysis for Modern Businesses
Custom Software Development Services: Change Management Strategy for Modern Businesses
Custom Software Development Services: Cost, Timeline, and ROI Playbook for Modern Businesses
Custom Software Development Services: Enterprise Rollout Framework for Modern Businesses
Custom Software Development Services: Executive Decision Framework for Modern Businesses
Custom Software Development Services: Failure Patterns and Recovery for Modern Businesses
Custom Software Development Services: Implementation Blueprint for Modern Businesses
Custom Software Development Services: Integration Readiness Guide for Modern Businesses
Custom Software Development Services: KPI and Reporting Architecture for Modern Businesses
Custom Software Development Services: Leadership FAQ Guide for Modern Businesses
Custom Software Development Services: Product-Led Growth Lens for Modern Businesses
Custom Software Development Services: Risk Mitigation Playbook for Modern Businesses
Custom Software Development Services: Scalability Strategy for Modern Businesses
Custom Software Development Services: Security and Governance Model for Modern Businesses
Custom Software Development Services: Vendor Evaluation Checklist for Modern Businesses
Customer Analytics Platform Engineering: 90-Day Execution Plan for Modern Businesses
Customer Analytics Platform Engineering: Build vs Buy Analysis for Modern Businesses
Customer Analytics Platform Engineering: Change Management Strategy for Modern Businesses
Customer Analytics Platform Engineering: Cost, Timeline, and ROI Playbook for Modern Businesses
Customer Analytics Platform Engineering: Enterprise Rollout Framework for Modern Businesses
Customer Analytics Platform Engineering: Executive Decision Framework for Modern Businesses
Customer Analytics Platform Engineering: Failure Patterns and Recovery for Modern Businesses
Customer Analytics Platform Engineering: Implementation Blueprint for Modern Businesses
Customer Analytics Platform Engineering: Integration Readiness Guide for Modern Businesses
Customer Analytics Platform Engineering: KPI and Reporting Architecture for Modern Businesses
Customer Analytics Platform Engineering: Leadership FAQ Guide for Modern Businesses
Customer Analytics Platform Engineering: Product-Led Growth Lens for Modern Businesses
Customer Analytics Platform Engineering: Risk Mitigation Playbook for Modern Businesses
Customer Analytics Platform Engineering: Scalability Strategy for Modern Businesses
Customer Analytics Platform Engineering: Security and Governance Model for Modern Businesses
Customer Analytics Platform Engineering: Vendor Evaluation Checklist for Modern Businesses
Data Analytics Platform Development: 90-Day Execution Plan for Modern Businesses
Data Analytics Platform Development: 90-Day Execution Plan for Modern Businesses
Data Analytics Platform Development: Build vs Buy Analysis for Modern Businesses
Data Analytics Platform Development: Build vs Buy Analysis for Modern Businesses
Data Analytics Platform Development: Change Management Strategy for Modern Businesses
Data Analytics Platform Development: Change Management Strategy for Modern Businesses
Data Analytics Platform Development: Cost, Timeline, and ROI Playbook for Modern Businesses
Data Analytics Platform Development: Cost, Timeline, and ROI Playbook for Modern Businesses
Data Analytics Platform Development: Enterprise Rollout Framework for Modern Businesses
Data Analytics Platform Development: Enterprise Rollout Framework for Modern Businesses
Data Analytics Platform Development: Executive Decision Framework for Modern Businesses
Data Analytics Platform Development: Executive Decision Framework for Modern Businesses
Data Analytics Platform Development: Failure Patterns and Recovery for Modern Businesses
Data Analytics Platform Development: Failure Patterns and Recovery for Modern Businesses
Data Analytics Platform Development: Implementation Blueprint for Modern Businesses
Data Analytics Platform Development: Implementation Blueprint for Modern Businesses
Data Analytics Platform Development: Integration Readiness Guide for Modern Businesses
Data Analytics Platform Development: Integration Readiness Guide for Modern Businesses
Data Analytics Platform Development: KPI and Reporting Architecture for Modern Businesses
Data Analytics Platform Development: KPI and Reporting Architecture for Modern Businesses
Data Analytics Platform Development: Leadership FAQ Guide for Modern Businesses
Data Analytics Platform Development: Leadership FAQ Guide for Modern Businesses
Data Analytics Platform Development: Product-Led Growth Lens for Modern Businesses
Data Analytics Platform Development: Product-Led Growth Lens for Modern Businesses
Data Analytics Platform Development: Risk Mitigation Playbook for Modern Businesses
Data Analytics Platform Development: Scalability Strategy for Modern Businesses
Data Analytics Platform Development: Scalability Strategy for Modern Businesses
Data Analytics Platform Development: Security and Governance Model for Modern Businesses
Data Analytics Platform Development: Security and Governance Model for Modern Businesses
Data Analytics Platform Development: Vendor Evaluation Checklist for Modern Businesses
Data Analytics Platform Development: Vendor Evaluation Checklist for Modern Businesses
Data Integration Pipeline Development: 90-Day Execution Plan for Modern Businesses
Data Integration Pipeline Development: Build vs Buy Analysis for Modern Businesses
Data Integration Pipeline Development: Change Management Strategy for Modern Businesses
Data Integration Pipeline Development: Cost, Timeline, and ROI Playbook for Modern Businesses
Data Integration Pipeline Development: Enterprise Rollout Framework for Modern Businesses
Data Integration Pipeline Development: Executive Decision Framework for Modern Businesses
Data Integration Pipeline Development: Failure Patterns and Recovery for Modern Businesses
Data Integration Pipeline Development: Implementation Blueprint for Modern Businesses
Data Integration Pipeline Development: Integration Readiness Guide for Modern Businesses
Data Integration Pipeline Development: KPI and Reporting Architecture for Modern Businesses
Data Integration Pipeline Development: Leadership FAQ Guide for Modern Businesses
Data Integration Pipeline Development: Product-Led Growth Lens for Modern Businesses
Data Integration Pipeline Development: Risk Mitigation Playbook for Modern Businesses
Data Integration Pipeline Development: Scalability Strategy for Modern Businesses
Data Integration Pipeline Development: Security and Governance Model for Modern Businesses
Data Integration Pipeline Development: Vendor Evaluation Checklist for Modern Businesses
Data Warehouse Architecture For Companies: 90-Day Execution Plan for Modern Businesses
Data Warehouse Architecture For Companies: 90-Day Execution Plan for Modern Businesses
Data Warehouse Architecture For Companies: Build vs Buy Analysis for Modern Businesses
Data Warehouse Architecture For Companies: Build vs Buy Analysis for Modern Businesses
Data Warehouse Architecture For Companies: Change Management Strategy for Modern Businesses
Data Warehouse Architecture For Companies: Change Management Strategy for Modern Businesses
Data Warehouse Architecture For Companies: Cost, Timeline, and ROI Playbook for Modern Businesses
Data Warehouse Architecture For Companies: Cost, Timeline, and ROI Playbook for Modern Businesses
Data Warehouse Architecture For Companies: Enterprise Rollout Framework for Modern Businesses
Data Warehouse Architecture For Companies: Enterprise Rollout Framework for Modern Businesses
Data Warehouse Architecture For Companies: Executive Decision Framework for Modern Businesses
Data Warehouse Architecture For Companies: Executive Decision Framework for Modern Businesses
Data Warehouse Architecture For Companies: Failure Patterns and Recovery for Modern Businesses
Data Warehouse Architecture For Companies: Failure Patterns and Recovery for Modern Businesses
Data Warehouse Architecture For Companies: Implementation Blueprint for Modern Businesses
Data Warehouse Architecture For Companies: Implementation Blueprint for Modern Businesses
Data Warehouse Architecture For Companies: Integration Readiness Guide for Modern Businesses
Data Warehouse Architecture For Companies: Integration Readiness Guide for Modern Businesses
Data Warehouse Architecture For Companies: KPI and Reporting Architecture for Modern Businesses
Data Warehouse Architecture For Companies: KPI and Reporting Architecture for Modern Businesses
Data Warehouse Architecture For Companies: Leadership FAQ Guide for Modern Businesses
Data Warehouse Architecture For Companies: Leadership FAQ Guide for Modern Businesses
Data Warehouse Architecture For Companies: Product-Led Growth Lens for Modern Businesses
Data Warehouse Architecture For Companies: Product-Led Growth Lens for Modern Businesses
Data Warehouse Architecture For Companies: Risk Mitigation Playbook for Modern Businesses
Data Warehouse Architecture For Companies: Scalability Strategy for Modern Businesses
Data Warehouse Architecture For Companies: Scalability Strategy for Modern Businesses
Data Warehouse Architecture For Companies: Security and Governance Model for Modern Businesses
Data Warehouse Architecture For Companies: Security and Governance Model for Modern Businesses
Data Warehouse Architecture For Companies: Vendor Evaluation Checklist for Modern Businesses
Data Warehouse Architecture For Companies: Vendor Evaluation Checklist for Modern Businesses
Data Warehouse Implementation: Strategic Playbook for Modern Businesses
Data Warehouse Implementation: Strategic Playbook for Modern Businesses
Data Warehouse Implementation: Strategic Playbook for Modern Businesses
Data Warehouse Implementation: Strategic Playbook for Modern Businesses
Data Warehouse Implementation: Strategic Playbook for Modern Businesses
Data Warehouse Implementation: Strategic Playbook for Modern Businesses
Data Warehouse Implementation: Strategic Playbook for Modern Businesses
Data Warehouse Implementation: Strategic Playbook for Modern Businesses
Data Warehouse Implementation: Strategic Playbook for Modern Businesses
Data Warehouse Implementation Services: 90-Day Execution Plan for Modern Businesses
Data Warehouse Implementation Services: Build vs Buy Analysis for Modern Businesses
Data Warehouse Implementation Services: Change Management Strategy for Modern Businesses
Data Warehouse Implementation Services: Cost, Timeline, and ROI Playbook for Modern Businesses
Data Warehouse Implementation Services: Enterprise Rollout Framework for Modern Businesses
Data Warehouse Implementation Services: Executive Decision Framework for Modern Businesses
Data Warehouse Implementation Services: Failure Patterns and Recovery for Modern Businesses
Data Warehouse Implementation Services: Implementation Blueprint for Modern Businesses
Data Warehouse Implementation Services: Integration Readiness Guide for Modern Businesses
Data Warehouse Implementation Services: KPI and Reporting Architecture for Modern Businesses
Data Warehouse Implementation Services: Leadership FAQ Guide for Modern Businesses
Data Warehouse Implementation Services: Product-Led Growth Lens for Modern Businesses
Data Warehouse Implementation Services: Risk Mitigation Playbook for Modern Businesses
Data Warehouse Implementation Services: Scalability Strategy for Modern Businesses
Data Warehouse Implementation Services: Security and Governance Model for Modern Businesses
Data Warehouse Implementation Services: Vendor Evaluation Checklist for Modern Businesses
Data Warehouse Implementation: Strategic Playbook for Modern Businesses
Database Architecture And Engineering Services: 90-Day Execution Plan for Modern Businesses
Database Architecture And Engineering Services: 90-Day Execution Plan for Modern Businesses
Database Architecture And Engineering Services: Build vs Buy Analysis for Modern Businesses
Database Architecture And Engineering Services: Build vs Buy Analysis for Modern Businesses
Database Architecture And Engineering Services: Change Management Strategy for Modern Businesses
Database Architecture And Engineering Services: Change Management Strategy for Modern Businesses
Database Architecture And Engineering Services: Enterprise Rollout Framework for Modern Businesses
Database Architecture And Engineering Services: Enterprise Rollout Framework for Modern Businesses
Database Architecture And Engineering Services: Executive Decision Framework for Modern Businesses
Database Architecture And Engineering Services: Executive Decision Framework for Modern Businesses
Database Architecture And Engineering Services: Failure Patterns and Recovery for Modern Businesses
Database Architecture And Engineering Services: Failure Patterns and Recovery for Modern Businesses
Database Architecture And Engineering Services: Implementation Blueprint for Modern Businesses
Database Architecture And Engineering Services: Implementation Blueprint for Modern Businesses
Database Architecture And Engineering Services: Integration Readiness Guide for Modern Businesses
Database Architecture And Engineering Services: Integration Readiness Guide for Modern Businesses
Database Architecture And Engineering Services: KPI and Reporting Architecture for Modern Businesses
Database Architecture And Engineering Services: KPI and Reporting Architecture for Modern Businesses
Database Architecture And Engineering Services: Leadership FAQ Guide for Modern Businesses
Database Architecture And Engineering Services: Leadership FAQ Guide for Modern Businesses
Database Architecture And Engineering Services: Product-Led Growth Lens for Modern Businesses
Database Architecture And Engineering Services: Product-Led Growth Lens for Modern Businesses
Database Architecture And Engineering Services: Risk Mitigation Playbook for Modern Businesses
Database Architecture And Engineering Services: Scalability Strategy for Modern Businesses
Database Architecture And Engineering Services: Scalability Strategy for Modern Businesses
Database Architecture And Engineering Services: Security and Governance Model for Modern Businesses
Database Architecture And Engineering Services: Security and Governance Model for Modern Businesses
Database Architecture And Engineering Services: Vendor Evaluation Checklist for Modern Businesses
Database Architecture And Engineering Services: Vendor Evaluation Checklist for Modern Businesses
Database Modernization Services: 90-Day Execution Plan for Modern Businesses
Database Modernization Services Architecture Due Diligence: Strategic Playbook for Modern Businesses
Database Modernization Services: Build vs Buy Analysis for Modern Businesses
Database Modernization Services: Change Management Strategy for Modern Businesses
Database Modernization Services: Cost, Timeline, and ROI Playbook for Modern Businesses
Database Modernization Services: Enterprise Rollout Framework for Modern Businesses
Database Modernization Services: Executive Decision Framework for Modern Businesses
Database Modernization Services: Failure Patterns and Recovery for Modern Businesses
Database Modernization Services: Implementation Blueprint for Modern Businesses
Database Modernization Services: Integration Readiness Guide for Modern Businesses
Database Modernization Services: KPI and Reporting Architecture for Modern Businesses
Database Modernization Services: Leadership FAQ Guide for Modern Businesses
Database Modernization Services Procurement Strategy Brief: Strategic Playbook for Modern Businesses
Database Modernization Services: Product-Led Growth Lens for Modern Businesses
Database Modernization Services: Risk Mitigation Playbook for Modern Businesses
Database Modernization Services: Scalability Strategy for Modern Businesses
Database Modernization Services: Security and Governance Model for Modern Businesses
Database Modernization Services: Vendor Evaluation Checklist for Modern Businesses
Database Offline: Strategic Playbook for Modern Businesses
Database Online: Strategic Playbook for Modern Businesses
Database Scalability Consulting: 90-Day Execution Plan for Modern Businesses
Database Scalability Consulting Architecture Due Diligence: Strategic Playbook for Modern Businesses
Database Scalability Consulting: Build vs Buy Analysis for Modern Businesses
Database Scalability Consulting: Change Management Strategy for Modern Businesses
Database Scalability Consulting: Cost, Timeline, and ROI Playbook for Modern Businesses
Database Scalability Consulting: Enterprise Rollout Framework for Modern Businesses
Database Scalability Consulting: Executive Decision Framework for Modern Businesses
Database Scalability Consulting: Failure Patterns and Recovery for Modern Businesses
Database Scalability Consulting: Implementation Blueprint for Modern Businesses
Database Scalability Consulting: Integration Readiness Guide for Modern Businesses
Database Scalability Consulting: KPI and Reporting Architecture for Modern Businesses
Database Scalability Consulting: Leadership FAQ Guide for Modern Businesses
Database Scalability Consulting Procurement Strategy Brief: Strategic Playbook for Modern Businesses
Database Scalability Consulting: Product-Led Growth Lens for Modern Businesses
Database Scalability Consulting: Risk Mitigation Playbook for Modern Businesses
Database Scalability Consulting: Scalability Strategy for Modern Businesses
Database Scalability Consulting: Security and Governance Model for Modern Businesses
Database Scalability Consulting: Vendor Evaluation Checklist for Modern Businesses
Decision Intelligence Platform Development: 90-Day Execution Plan for Modern Businesses
Decision Intelligence Platform Development: Build vs Buy Analysis for Modern Businesses
Decision Intelligence Platform Development: Change Management Strategy for Modern Businesses
Decision Intelligence Platform Development: Cost, Timeline, and ROI Playbook for Modern Businesses
Decision Intelligence Platform Development: Enterprise Rollout Framework for Modern Businesses
Decision Intelligence Platform Development: Executive Decision Framework for Modern Businesses
Decision Intelligence Platform Development: Failure Patterns and Recovery for Modern Businesses
Decision Intelligence Platform Development: Implementation Blueprint for Modern Businesses
Decision Intelligence Platform Development: Integration Readiness Guide for Modern Businesses
Decision Intelligence Platform Development: KPI and Reporting Architecture for Modern Businesses
Decision Intelligence Platform Development: Leadership FAQ Guide for Modern Businesses
Decision Intelligence Platform Development: Product-Led Growth Lens for Modern Businesses
Decision Intelligence Platform Development: Risk Mitigation Playbook for Modern Businesses
Decision Intelligence Platform Development: Scalability Strategy for Modern Businesses
Decision Intelligence Platform Development: Security and Governance Model for Modern Businesses
Decision Intelligence Platform Development: Vendor Evaluation Checklist for Modern Businesses
Define Transaction In Dbms: Strategic Playbook for Modern Businesses
Delete Database: Strategic Playbook for Modern Businesses
Delete Table: Strategic Playbook for Modern Businesses
Detach Database: Strategic Playbook for Modern Businesses
Difference Between Dbms And Data Warehouse: Strategic Playbook for Modern Businesses
Store Procedure Vs Function: Strategic Playbook for Modern Businesses
Digital Platform Engineering Services: 90-Day Execution Plan for Modern Businesses
Digital Platform Engineering Services: Build vs Buy Analysis for Modern Businesses
Digital Platform Engineering Services: Change Management Strategy for Modern Businesses
Digital Platform Engineering Services: Cost, Timeline, and ROI Playbook for Modern Businesses
Digital Platform Engineering Services: Enterprise Rollout Framework for Modern Businesses
Digital Platform Engineering Services: Executive Decision Framework for Modern Businesses
Digital Platform Engineering Services: Failure Patterns and Recovery for Modern Businesses
Digital Platform Engineering Services: Implementation Blueprint for Modern Businesses
Digital Platform Engineering Services: Integration Readiness Guide for Modern Businesses
Digital Platform Engineering Services: KPI and Reporting Architecture for Modern Businesses
Digital Platform Engineering Services: Leadership FAQ Guide for Modern Businesses
Digital Platform Engineering Services: Product-Led Growth Lens for Modern Businesses
Digital Platform Engineering Services: Scalability Strategy for Modern Businesses
Digital Platform Engineering Services: Security and Governance Model for Modern Businesses
Digital Platform Engineering Services: Vendor Evaluation Checklist for Modern Businesses
Download Database: Strategic Playbook for Modern Businesses
Download Sql Server: Strategic Playbook for Modern Businesses
Download Sql Server Management Studio Ssms: Strategic Playbook for Modern Businesses
Ecommerce Software For Businesses: 90-Day Execution Plan for Modern Businesses
Ecommerce Software For Businesses: 90-Day Execution Plan for Modern Businesses
Ecommerce Software For Businesses: Build vs Buy Analysis for Modern Businesses
Ecommerce Software For Businesses: Build vs Buy Analysis for Modern Businesses
Ecommerce Software For Businesses: Change Management Strategy for Modern Businesses
Ecommerce Software For Businesses: Change Management Strategy for Modern Businesses
Ecommerce Software For Businesses: Cost, Timeline, and ROI Playbook for Modern Businesses
Ecommerce Software For Businesses: Cost, Timeline, and ROI Playbook for Modern Businesses
Ecommerce Software For Businesses: Enterprise Rollout Framework for Modern Businesses
Ecommerce Software For Businesses: Enterprise Rollout Framework for Modern Businesses
Ecommerce Software For Businesses: Executive Decision Framework for Modern Businesses
Ecommerce Software For Businesses: Executive Decision Framework for Modern Businesses
Ecommerce Software For Businesses: Failure Patterns and Recovery for Modern Businesses
Ecommerce Software For Businesses: Failure Patterns and Recovery for Modern Businesses
Ecommerce Software For Businesses: Implementation Blueprint for Modern Businesses
Ecommerce Software For Businesses: Implementation Blueprint for Modern Businesses
Ecommerce Software For Businesses: Integration Readiness Guide for Modern Businesses
Ecommerce Software For Businesses: Integration Readiness Guide for Modern Businesses
Ecommerce Software For Businesses: KPI and Reporting Architecture for Modern Businesses
Ecommerce Software For Businesses: KPI and Reporting Architecture for Modern Businesses
Ecommerce Software For Businesses: Leadership FAQ Guide for Modern Businesses
Ecommerce Software For Businesses: Leadership FAQ Guide for Modern Businesses
Ecommerce Software For Businesses: Product-Led Growth Lens for Modern Businesses
Ecommerce Software For Businesses: Product-Led Growth Lens for Modern Businesses
Ecommerce Software For Businesses: Risk Mitigation Playbook for Modern Businesses
Ecommerce Software For Businesses: Scalability Strategy for Modern Businesses
Ecommerce Software For Businesses: Scalability Strategy for Modern Businesses
Ecommerce Software For Businesses: Security and Governance Model for Modern Businesses
Ecommerce Software For Businesses: Security and Governance Model for Modern Businesses
Ecommerce Software For Businesses: Vendor Evaluation Checklist for Modern Businesses
Ecommerce Software For Businesses: Vendor Evaluation Checklist for Modern Businesses
Enterprise Custom Application Development: 90-Day Execution Plan for Modern Businesses
Enterprise Custom Application Development: Build vs Buy Analysis for Modern Businesses
Enterprise Custom Application Development: Change Management Strategy for Modern Businesses
Enterprise Custom Application Development: Cost, Timeline, and ROI Playbook for Modern Businesses
Enterprise Custom Application Development: Enterprise Rollout Framework for Modern Businesses
Enterprise Custom Application Development: Executive Decision Framework for Modern Businesses
Enterprise Custom Application Development: Failure Patterns and Recovery for Modern Businesses
Enterprise Custom Application Development: Implementation Blueprint for Modern Businesses
Enterprise Custom Application Development: Integration Readiness Guide for Modern Businesses
Enterprise Custom Application Development: KPI and Reporting Architecture for Modern Businesses
Enterprise Custom Application Development: Leadership FAQ Guide for Modern Businesses
Enterprise Custom Application Development: Product-Led Growth Lens for Modern Businesses
Enterprise Custom Application Development: Risk Mitigation Playbook for Modern Businesses
Enterprise Custom Application Development: Scalability Strategy for Modern Businesses
Enterprise Custom Application Development: Security and Governance Model for Modern Businesses
Enterprise Custom Application Development: Vendor Evaluation Checklist for Modern Businesses
Enterprise Data Warehousing Solutions: 90-Day Execution Plan for Modern Businesses
Enterprise Data Warehousing Solutions: Build vs Buy Analysis for Modern Businesses
Enterprise Data Warehousing Solutions: Change Management Strategy for Modern Businesses
Enterprise Data Warehousing Solutions: Cost, Timeline, and ROI Playbook for Modern Businesses
Enterprise Data Warehousing Solutions: Enterprise Rollout Framework for Modern Businesses
Enterprise Data Warehousing Solutions: Executive Decision Framework for Modern Businesses
Enterprise Data Warehousing Solutions: Failure Patterns and Recovery for Modern Businesses
Enterprise Data Warehousing Solutions: Implementation Blueprint for Modern Businesses
Enterprise Data Warehousing Solutions: Integration Readiness Guide for Modern Businesses
Enterprise Data Warehousing Solutions: KPI and Reporting Architecture for Modern Businesses
Enterprise Data Warehousing Solutions: Leadership FAQ Guide for Modern Businesses
Enterprise Data Warehousing Solutions: Product-Led Growth Lens for Modern Businesses
Enterprise Data Warehousing Solutions: Risk Mitigation Playbook for Modern Businesses
Enterprise Data Warehousing Solutions: Scalability Strategy for Modern Businesses
Enterprise Data Warehousing Solutions: Security and Governance Model for Modern Businesses
Enterprise Data Warehousing Solutions: Vendor Evaluation Checklist for Modern Businesses
Enterprise Etl Automation Solutions: 90-Day Execution Plan for Modern Businesses
Enterprise Etl Automation Solutions: Build vs Buy Analysis for Modern Businesses
Enterprise Etl Automation Solutions: Change Management Strategy for Modern Businesses
Enterprise Etl Automation Solutions: Cost, Timeline, and ROI Playbook for Modern Businesses
Enterprise Etl Automation Solutions: Enterprise Rollout Framework for Modern Businesses
Enterprise Etl Automation Solutions: Executive Decision Framework for Modern Businesses
Enterprise Etl Automation Solutions: Failure Patterns and Recovery for Modern Businesses
Enterprise Etl Automation Solutions: Implementation Blueprint for Modern Businesses
Enterprise Etl Automation Solutions: Integration Readiness Guide for Modern Businesses
Enterprise Etl Automation Solutions: KPI and Reporting Architecture for Modern Businesses
Enterprise Etl Automation Solutions: Leadership FAQ Guide for Modern Businesses
Enterprise Etl Automation Solutions: Product-Led Growth Lens for Modern Businesses
Enterprise Etl Automation Solutions: Risk Mitigation Playbook for Modern Businesses
Enterprise Etl Automation Solutions: Scalability Strategy for Modern Businesses
Enterprise Etl Automation Solutions: Security and Governance Model for Modern Businesses
Enterprise Etl Automation Solutions: Vendor Evaluation Checklist for Modern Businesses
Enterprise Product Engineering: Strategic Playbook for Modern Businesses
Enterprise Product Engineering: Strategic Playbook for Modern Businesses
Enterprise Product Engineering: Strategic Playbook for Modern Businesses
Enterprise Product Engineering: Strategic Playbook for Modern Businesses
Enterprise Product Engineering: Strategic Playbook for Modern Businesses
Enterprise Product Engineering: Strategic Playbook for Modern Businesses
Enterprise Product Engineering: Strategic Playbook for Modern Businesses
Enterprise Product Engineering: Strategic Playbook for Modern Businesses
Enterprise Product Engineering: Strategic Playbook for Modern Businesses
Enterprise Product Engineering: Strategic Playbook for Modern Businesses
Enterprise Reporting System Development: 90-Day Execution Plan for Modern Businesses
Enterprise Reporting System Development: 90-Day Execution Plan for Modern Businesses
Enterprise Reporting System Development: Build vs Buy Analysis for Modern Businesses
Enterprise Reporting System Development: Build vs Buy Analysis for Modern Businesses
Enterprise Reporting System Development: Change Management Strategy for Modern Businesses
Enterprise Reporting System Development: Change Management Strategy for Modern Businesses
Enterprise Reporting System Development: Cost, Timeline, and ROI Playbook for Modern Businesses
Enterprise Reporting System Development: Cost, Timeline, and ROI Playbook for Modern Businesses
Enterprise Reporting System Development: Enterprise Rollout Framework for Modern Businesses
Enterprise Reporting System Development: Enterprise Rollout Framework for Modern Businesses
Enterprise Reporting System Development: Executive Decision Framework for Modern Businesses
Enterprise Reporting System Development: Executive Decision Framework for Modern Businesses
Enterprise Reporting System Development: Failure Patterns and Recovery for Modern Businesses
Enterprise Reporting System Development: Failure Patterns and Recovery for Modern Businesses
Enterprise Reporting System Development: Implementation Blueprint for Modern Businesses
Enterprise Reporting System Development: Implementation Blueprint for Modern Businesses
Enterprise Reporting System Development: Integration Readiness Guide for Modern Businesses
Enterprise Reporting System Development: Integration Readiness Guide for Modern Businesses
Enterprise Reporting System Development: KPI and Reporting Architecture for Modern Businesses
Enterprise Reporting System Development: KPI and Reporting Architecture for Modern Businesses
Enterprise Reporting System Development: Leadership FAQ Guide for Modern Businesses
Enterprise Reporting System Development: Leadership FAQ Guide for Modern Businesses
Enterprise Reporting System Development: Product-Led Growth Lens for Modern Businesses
Enterprise Reporting System Development: Product-Led Growth Lens for Modern Businesses
Enterprise Reporting System Development: Risk Mitigation Playbook for Modern Businesses
Enterprise Reporting System Development: Scalability Strategy for Modern Businesses
Enterprise Reporting System Development: Scalability Strategy for Modern Businesses
Enterprise Reporting System Development: Security and Governance Model for Modern Businesses
Enterprise Reporting System Development: Security and Governance Model for Modern Businesses
Enterprise Reporting System Development: Vendor Evaluation Checklist for Modern Businesses
Enterprise Reporting System Development: Vendor Evaluation Checklist for Modern Businesses
Enterprise Web Application Development: 90-Day Execution Plan for Modern Businesses
Enterprise Web Application Development: Build vs Buy Analysis for Modern Businesses
Enterprise Web Application Development: Strategic Playbook for Modern Businesses
Enterprise Web Application Development: Change Management Strategy for Modern Businesses
Enterprise Web Application Development: Strategic Playbook for Modern Businesses
Enterprise Web Application Development: Strategic Playbook for Modern Businesses
Enterprise Web Application Development: Cost, Timeline, and ROI Playbook for Modern Businesses
Enterprise Web Application Development: Enterprise Rollout Framework for Modern Businesses
Enterprise Web Application Development: Strategic Playbook for Modern Businesses
Enterprise Web Application Development: Executive Decision Framework for Modern Businesses
Enterprise Web Application Development: Failure Patterns and Recovery for Modern Businesses
Enterprise Web Application Development: Strategic Playbook for Modern Businesses
Enterprise Web Application Development: Implementation Blueprint for Modern Businesses
Enterprise Web Application Development: Strategic Playbook for Modern Businesses
Enterprise Web Application Development: Integration Readiness Guide for Modern Businesses
Enterprise Web Application Development: KPI and Reporting Architecture for Modern Businesses
Enterprise Web Application Development: Strategic Playbook for Modern Businesses
Enterprise Web Application Development: Leadership FAQ Guide for Modern Businesses
Enterprise Web Application Development: Product-Led Growth Lens for Modern Businesses
Enterprise Web Application Development: Risk Mitigation Playbook for Modern Businesses
Enterprise Web Application Development: Scalability Strategy for Modern Businesses
Enterprise Web Application Development: Strategic Playbook for Modern Businesses
Enterprise Web Application Development: Strategic Playbook for Modern Businesses
Enterprise Web Application Development: Security and Governance Model for Modern Businesses
Enterprise Web Application Development: Strategic Playbook for Modern Businesses
Enterprise Web Application Development: Vendor Evaluation Checklist for Modern Businesses
Enterprise Web Development Services: 90-Day Execution Plan for Modern Businesses
Enterprise Web Development Services: 90-Day Execution Plan for Modern Businesses
Enterprise Web Development Services: Build vs Buy Analysis for Modern Businesses
Enterprise Web Development Services: Build vs Buy Analysis for Modern Businesses
Enterprise Web Development Services: Change Management Strategy for Modern Businesses
Enterprise Web Development Services: Change Management Strategy for Modern Businesses
Enterprise Web Development Services: Cost, Timeline, and ROI Playbook for Modern Businesses
Enterprise Web Development Services: Cost, Timeline, and ROI Playbook for Modern Businesses
Enterprise Web Development Services: Enterprise Rollout Framework for Modern Businesses
Enterprise Web Development Services: Enterprise Rollout Framework for Modern Businesses
Enterprise Web Development Services: Executive Decision Framework for Modern Businesses
Enterprise Web Development Services: Executive Decision Framework for Modern Businesses
Enterprise Web Development Services: Failure Patterns and Recovery for Modern Businesses
Enterprise Web Development Services: Failure Patterns and Recovery for Modern Businesses
Enterprise Web Development Services: Implementation Blueprint for Modern Businesses
Enterprise Web Development Services: Implementation Blueprint for Modern Businesses
Enterprise Web Development Services: Integration Readiness Guide for Modern Businesses
Enterprise Web Development Services: Integration Readiness Guide for Modern Businesses
Enterprise Web Development Services: KPI and Reporting Architecture for Modern Businesses
Enterprise Web Development Services: KPI and Reporting Architecture for Modern Businesses
Enterprise Web Development Services: Leadership FAQ Guide for Modern Businesses
Enterprise Web Development Services: Leadership FAQ Guide for Modern Businesses
Enterprise Web Development Services: Product-Led Growth Lens for Modern Businesses
Enterprise Web Development Services: Product-Led Growth Lens for Modern Businesses
Enterprise Web Development Services: Risk Mitigation Playbook for Modern Businesses
Enterprise Web Development Services: Scalability Strategy for Modern Businesses
Enterprise Web Development Services: Scalability Strategy for Modern Businesses
Enterprise Web Development Services: Security and Governance Model for Modern Businesses
Enterprise Web Development Services: Security and Governance Model for Modern Businesses
Enterprise Web Development Services: Vendor Evaluation Checklist for Modern Businesses
Enterprise Web Development Services: Vendor Evaluation Checklist for Modern Businesses
Etl Pipeline Development Services: 90-Day Execution Plan for Modern Businesses
Etl Pipeline Development Services: 90-Day Execution Plan for Modern Businesses
Etl Pipeline Development Services: Build vs Buy Analysis for Modern Businesses
Etl Pipeline Development Services: Build vs Buy Analysis for Modern Businesses
Etl Pipeline Development Services: Strategic Playbook for Modern Businesses
Etl Pipeline Development Services: Change Management Strategy for Modern Businesses
Etl Pipeline Development Services: Change Management Strategy for Modern Businesses
Etl Pipeline Development Services: Strategic Playbook for Modern Businesses
Etl Pipeline Development Services: Strategic Playbook for Modern Businesses
Etl Pipeline Development Services: Cost, Timeline, and ROI Playbook for Modern Businesses
Etl Pipeline Development Services: Cost, Timeline, and ROI Playbook for Modern Businesses
Etl Pipeline Development Services: Enterprise Rollout Framework for Modern Businesses
Etl Pipeline Development Services: Enterprise Rollout Framework for Modern Businesses
Etl Pipeline Development Services: Strategic Playbook for Modern Businesses
Etl Pipeline Development Services: Executive Decision Framework for Modern Businesses
Etl Pipeline Development Services: Executive Decision Framework for Modern Businesses
Etl Pipeline Development Services: Failure Patterns and Recovery for Modern Businesses
Etl Pipeline Development Services: Failure Patterns and Recovery for Modern Businesses
Etl Pipeline Development Services: Strategic Playbook for Modern Businesses
Etl Pipeline Development Services: Implementation Blueprint for Modern Businesses
Etl Pipeline Development Services: Implementation Blueprint for Modern Businesses
Etl Pipeline Development Services: Strategic Playbook for Modern Businesses
Etl Pipeline Development Services: Integration Readiness Guide for Modern Businesses
Etl Pipeline Development Services: Integration Readiness Guide for Modern Businesses
Etl Pipeline Development Services: KPI and Reporting Architecture for Modern Businesses
Etl Pipeline Development Services: KPI and Reporting Architecture for Modern Businesses
Etl Pipeline Development Services: Strategic Playbook for Modern Businesses
Etl Pipeline Development Services: Leadership FAQ Guide for Modern Businesses
Etl Pipeline Development Services: Leadership FAQ Guide for Modern Businesses
Etl Pipeline Development Services: Product-Led Growth Lens for Modern Businesses
Etl Pipeline Development Services: Product-Led Growth Lens for Modern Businesses
Etl Pipeline Development Services: Risk Mitigation Playbook for Modern Businesses
Etl Pipeline Development Services: Scalability Strategy for Modern Businesses
Etl Pipeline Development Services: Scalability Strategy for Modern Businesses
Etl Pipeline Development Services: Strategic Playbook for Modern Businesses
Etl Pipeline Development Services: Strategic Playbook for Modern Businesses
Etl Pipeline Development Services: Security and Governance Model for Modern Businesses
Etl Pipeline Development Services: Security and Governance Model for Modern Businesses
Etl Pipeline Development Services: Strategic Playbook for Modern Businesses
Etl Pipeline Development Services: Vendor Evaluation Checklist for Modern Businesses
Etl Pipeline Development Services: Vendor Evaluation Checklist for Modern Businesses
Except Operator: Strategic Playbook for Modern Businesses
Executive Dashboard Development Company: 90-Day Execution Plan for Modern Businesses
Executive Dashboard Development Company: Build vs Buy Analysis for Modern Businesses
Executive Dashboard Development Company: Change Management Strategy for Modern Businesses
Executive Dashboard Development Company: Cost, Timeline, and ROI Playbook for Modern Businesses
Executive Dashboard Development Company: Enterprise Rollout Framework for Modern Businesses
Executive Dashboard Development Company: Executive Decision Framework for Modern Businesses
Executive Dashboard Development Company: Failure Patterns and Recovery for Modern Businesses
Executive Dashboard Development Company: Implementation Blueprint for Modern Businesses
Executive Dashboard Development Company: Integration Readiness Guide for Modern Businesses
Executive Dashboard Development Company: KPI and Reporting Architecture for Modern Businesses
Executive Dashboard Development Company: Leadership FAQ Guide for Modern Businesses
Executive Dashboard Development Company: Product-Led Growth Lens for Modern Businesses
Executive Dashboard Development Company: Risk Mitigation Playbook for Modern Businesses
Executive Dashboard Development Company: Scalability Strategy for Modern Businesses
Executive Dashboard Development Company: Security and Governance Model for Modern Businesses
Executive Dashboard Development Company: Vendor Evaluation Checklist for Modern Businesses
Exists Operator: Strategic Playbook for Modern Businesses
Founder Led Product Engineering Partner: 90-Day Execution Plan for Modern Businesses
Founder Led Product Engineering Partner: Build vs Buy Analysis for Modern Businesses
Founder Led Product Engineering Partner: Change Management Strategy for Modern Businesses
Founder Led Product Engineering Partner: Cost, Timeline, and ROI Playbook for Modern Businesses
Founder Led Product Engineering Partner: Enterprise Rollout Framework for Modern Businesses
Founder Led Product Engineering Partner: Executive Decision Framework for Modern Businesses
Founder Led Product Engineering Partner: Failure Patterns and Recovery for Modern Businesses
Founder Led Product Engineering Partner: Implementation Blueprint for Modern Businesses
Founder Led Product Engineering Partner: Integration Readiness Guide for Modern Businesses
Founder Led Product Engineering Partner: KPI and Reporting Architecture for Modern Businesses
Founder Led Product Engineering Partner: Leadership FAQ Guide for Modern Businesses
Founder Led Product Engineering Partner: Product-Led Growth Lens for Modern Businesses
Founder Led Product Engineering Partner: Risk Mitigation Playbook for Modern Businesses
Founder Led Product Engineering Partner: Scalability Strategy for Modern Businesses
Founder Led Product Engineering Partner: Security and Governance Model for Modern Businesses
Founder Led Product Engineering Partner: Vendor Evaluation Checklist for Modern Businesses
Sql Full Join: Strategic Playbook for Modern Businesses
Gym Management Software Platform: 90-Day Execution Plan for Modern Businesses
Gym Management Software Platform: 90-Day Execution Plan for Modern Businesses
Gym Management Software Platform: Build vs Buy Analysis for Modern Businesses
Gym Management Software Platform: Build vs Buy Analysis for Modern Businesses
Gym Management Software Platform: Change Management Strategy for Modern Businesses
Gym Management Software Platform: Change Management Strategy for Modern Businesses
Gym Management Software Platform: Cost, Timeline, and ROI Playbook for Modern Businesses
Gym Management Software Platform: Cost, Timeline, and ROI Playbook for Modern Businesses
Gym Management Software Platform: Enterprise Rollout Framework for Modern Businesses
Gym Management Software Platform: Enterprise Rollout Framework for Modern Businesses
Gym Management Software Platform: Executive Decision Framework for Modern Businesses
Gym Management Software Platform: Executive Decision Framework for Modern Businesses
Gym Management Software Platform: Failure Patterns and Recovery for Modern Businesses
Gym Management Software Platform: Failure Patterns and Recovery for Modern Businesses
Gym Management Software Platform: Implementation Blueprint for Modern Businesses
Gym Management Software Platform: Implementation Blueprint for Modern Businesses
Gym Management Software Platform: Integration Readiness Guide for Modern Businesses
Gym Management Software Platform: Integration Readiness Guide for Modern Businesses
Gym Management Software Platform: KPI and Reporting Architecture for Modern Businesses
Gym Management Software Platform: KPI and Reporting Architecture for Modern Businesses
Gym Management Software Platform: Leadership FAQ Guide for Modern Businesses
Gym Management Software Platform: Leadership FAQ Guide for Modern Businesses
Gym Management Software Platform: Product-Led Growth Lens for Modern Businesses
Gym Management Software Platform: Product-Led Growth Lens for Modern Businesses
Gym Management Software Platform: Risk Mitigation Playbook for Modern Businesses
Gym Management Software Platform: Scalability Strategy for Modern Businesses
Gym Management Software Platform: Scalability Strategy for Modern Businesses
Gym Management Software Platform: Security and Governance Model for Modern Businesses
Gym Management Software Platform: Security and Governance Model for Modern Businesses
Gym Management Software Platform: Vendor Evaluation Checklist for Modern Businesses
Gym Management Software Platform: Vendor Evaluation Checklist for Modern Businesses
Gym Membership Billing Software: 90-Day Execution Plan for Modern Businesses
Gym Membership Billing Software Architecture Due Diligence: Strategic Playbook for Modern Businesses
Gym Membership Billing Software: Build vs Buy Analysis for Modern Businesses
Gym Membership Billing Software: Change Management Strategy for Modern Businesses
Gym Membership Billing Software: Cost, Timeline, and ROI Playbook for Modern Businesses
Gym Membership Billing Software: Enterprise Rollout Framework for Modern Businesses
Gym Membership Billing Software: Executive Decision Framework for Modern Businesses
Gym Membership Billing Software: Failure Patterns and Recovery for Modern Businesses
Gym Membership Billing Software: Implementation Blueprint for Modern Businesses
Gym Membership Billing Software: Integration Readiness Guide for Modern Businesses
Gym Membership Billing Software: KPI and Reporting Architecture for Modern Businesses
Gym Membership Billing Software: Leadership FAQ Guide for Modern Businesses
Gym Membership Billing Software Procurement Strategy Brief: Strategic Playbook for Modern Businesses
Gym Membership Billing Software: Product-Led Growth Lens for Modern Businesses
Gym Membership Billing Software: Risk Mitigation Playbook for Modern Businesses
Gym Membership Billing Software: Scalability Strategy for Modern Businesses
Gym Membership Billing Software: Security and Governance Model for Modern Businesses
Gym Membership Billing Software: Vendor Evaluation Checklist for Modern Businesses
In Operator: Strategic Playbook for Modern Businesses
Sql Inner Join: Strategic Playbook for Modern Businesses
Insert Into Statement: Strategic Playbook for Modern Businesses
Insert Into Select Statement: Strategic Playbook for Modern Businesses
Install Sql Server: Strategic Playbook for Modern Businesses
Intersect Operator: Strategic Playbook for Modern Businesses
Is Not Null Operator: Strategic Playbook for Modern Businesses
Is Null Operator: Strategic Playbook for Modern Businesses
Kpi Dashboard Development For Companies: 90-Day Execution Plan for Modern Businesses
Kpi Dashboard Development For Companies: Build vs Buy Analysis for Modern Businesses
Kpi Dashboard Development For Companies: Change Management Strategy for Modern Businesses
Kpi Dashboard Development For Companies: Cost, Timeline, and ROI Playbook for Modern Businesses
Kpi Dashboard Development For Companies: Enterprise Rollout Framework for Modern Businesses
Kpi Dashboard Development For Companies: Executive Decision Framework for Modern Businesses
Kpi Dashboard Development For Companies: Failure Patterns and Recovery for Modern Businesses
Kpi Dashboard Development For Companies: Implementation Blueprint for Modern Businesses
Kpi Dashboard Development For Companies: Integration Readiness Guide for Modern Businesses
Kpi Dashboard Development For Companies: KPI and Reporting Architecture for Modern Businesses
Kpi Dashboard Development For Companies: Leadership FAQ Guide for Modern Businesses
Kpi Dashboard Development For Companies: Product-Led Growth Lens for Modern Businesses
Kpi Dashboard Development For Companies: Risk Mitigation Playbook for Modern Businesses
Kpi Dashboard Development For Companies: Scalability Strategy for Modern Businesses
Kpi Dashboard Development For Companies: Security and Governance Model for Modern Businesses
Kpi Dashboard Development For Companies: Vendor Evaluation Checklist for Modern Businesses
Sql Left Join: Strategic Playbook for Modern Businesses
Like Operator: Strategic Playbook for Modern Businesses
Modern Data Warehouse Consulting: 90-Day Execution Plan for Modern Businesses
Modern Data Warehouse Consulting: Build vs Buy Analysis for Modern Businesses
Modern Data Warehouse Consulting: Change Management Strategy for Modern Businesses
Modern Data Warehouse Consulting: Cost, Timeline, and ROI Playbook for Modern Businesses
Modern Data Warehouse Consulting: Enterprise Rollout Framework for Modern Businesses
Modern Data Warehouse Consulting: Executive Decision Framework for Modern Businesses
Modern Data Warehouse Consulting: Failure Patterns and Recovery for Modern Businesses
Modern Data Warehouse Consulting: Implementation Blueprint for Modern Businesses
Modern Data Warehouse Consulting: Integration Readiness Guide for Modern Businesses
Modern Data Warehouse Consulting: KPI and Reporting Architecture for Modern Businesses
Modern Data Warehouse Consulting: Leadership FAQ Guide for Modern Businesses
Modern Data Warehouse Consulting: Product-Led Growth Lens for Modern Businesses
Modern Data Warehouse Consulting: Risk Mitigation Playbook for Modern Businesses
Modern Data Warehouse Consulting: Scalability Strategy for Modern Businesses
Modern Data Warehouse Consulting: Security and Governance Model for Modern Businesses
Modern Data Warehouse Consulting: Vendor Evaluation Checklist for Modern Businesses
Multi Tenant Saas Development: 90-Day Execution Plan for Modern Businesses
Multi Tenant Saas Development Architecture Due Diligence: Strategic Playbook for Modern Businesses
Multi Tenant Saas Development: Build vs Buy Analysis for Modern Businesses
Multi Tenant Saas Development: Change Management Strategy for Modern Businesses
Multi Tenant Saas Development: Cost, Timeline, and ROI Playbook for Modern Businesses
Multi Tenant Saas Development: Enterprise Rollout Framework for Modern Businesses
Multi Tenant Saas Development: Executive Decision Framework for Modern Businesses
Multi Tenant Saas Development: Failure Patterns and Recovery for Modern Businesses
Multi Tenant Saas Development: Implementation Blueprint for Modern Businesses
Multi Tenant Saas Development: Integration Readiness Guide for Modern Businesses
Multi Tenant Saas Development: KPI and Reporting Architecture for Modern Businesses
Multi Tenant Saas Development: Leadership FAQ Guide for Modern Businesses
Multi Tenant Saas Development Operational Excellence Model: Strategic Playbook for Modern Businesses
Multi Tenant Saas Development Procurement Strategy Brief: Strategic Playbook for Modern Businesses
Multi Tenant Saas Development: Product-Led Growth Lens for Modern Businesses
Multi Tenant Saas Development: Risk Mitigation Playbook for Modern Businesses
Multi Tenant Saas Development: Scalability Strategy for Modern Businesses
Multi Tenant Saas Development: Security and Governance Model for Modern Businesses
Multi Tenant Saas Development: Vendor Evaluation Checklist for Modern Businesses
Mvp App Development For Startups: 90-Day Execution Plan for Modern Businesses
Mvp App Development For Startups: Build vs Buy Analysis for Modern Businesses
Mvp App Development For Startups: Change Management Strategy for Modern Businesses
Mvp App Development For Startups: Cost, Timeline, and ROI Playbook for Modern Businesses
Mvp App Development For Startups: Enterprise Rollout Framework for Modern Businesses
Mvp App Development For Startups: Executive Decision Framework for Modern Businesses
Mvp App Development For Startups: Failure Patterns and Recovery for Modern Businesses
Mvp App Development For Startups: Implementation Blueprint for Modern Businesses
Mvp App Development For Startups: Integration Readiness Guide for Modern Businesses
Mvp App Development For Startups: KPI and Reporting Architecture for Modern Businesses
Mvp App Development For Startups: Leadership FAQ Guide for Modern Businesses
Mvp App Development For Startups: Product-Led Growth Lens for Modern Businesses
Mvp App Development For Startups: Risk Mitigation Playbook for Modern Businesses
Mvp App Development For Startups: Scalability Strategy for Modern Businesses
Mvp App Development For Startups: Security and Governance Model for Modern Businesses
Mvp App Development For Startups: Vendor Evaluation Checklist for Modern Businesses
Not Between Operator: Strategic Playbook for Modern Businesses
Not Exists Operator: Strategic Playbook for Modern Businesses
Not In Operator: Strategic Playbook for Modern Businesses
Not Like Operator: Strategic Playbook for Modern Businesses
Power Bi Dashboard Development Services: 90-Day Execution Plan for Modern Businesses
Power Bi Dashboard Development Services: Build vs Buy Analysis for Modern Businesses
Power Bi Dashboard Development Services: Strategic Playbook for Modern Businesses
Power Bi Dashboard Development Services: Change Management Strategy for Modern Businesses
Power Bi Dashboard Development Services: Strategic Playbook for Modern Businesses
Power Bi Dashboard Development Services: Strategic Playbook for Modern Businesses
Power Bi Dashboard Development Services: Cost, Timeline, and ROI Playbook for Modern Businesses
Power Bi Dashboard Development Services: Enterprise Rollout Framework for Modern Businesses
Power Bi Dashboard Development Services: Strategic Playbook for Modern Businesses
Power Bi Dashboard Development Services: Executive Decision Framework for Modern Businesses
Power Bi Dashboard Development Services: Failure Patterns and Recovery for Modern Businesses
Power Bi Dashboard Development Services: Strategic Playbook for Modern Businesses
Power Bi Dashboard Development Services: Implementation Blueprint for Modern Businesses
Power Bi Dashboard Development Services: Strategic Playbook for Modern Businesses
Power Bi Dashboard Development Services: Integration Readiness Guide for Modern Businesses
Power Bi Dashboard Development Services: KPI and Reporting Architecture for Modern Businesses
Power Bi Dashboard Development Services: Strategic Playbook for Modern Businesses
Power Bi Dashboard Development Services: Leadership FAQ Guide for Modern Businesses
Power Bi Dashboard Development Services: Product-Led Growth Lens for Modern Businesses
Power Bi Dashboard Development Services: Risk Mitigation Playbook for Modern Businesses
Power Bi Dashboard Development Services: Scalability Strategy for Modern Businesses
Power Bi Dashboard Development Services: Strategic Playbook for Modern Businesses
Power Bi Dashboard Development Services: Strategic Playbook for Modern Businesses
Power Bi Dashboard Development Services: Security and Governance Model for Modern Businesses
Power Bi Dashboard Development Services: Strategic Playbook for Modern Businesses
Power Bi Dashboard Development Services: Vendor Evaluation Checklist for Modern Businesses
Query Optimization For Enterprise Applications: 90-Day Execution Plan for Modern Businesses
Query Optimization For Enterprise Applications: Build vs Buy Analysis for Modern Businesses
Query Optimization For Enterprise Applications: Change Management Strategy for Modern Businesses
Query Optimization For Enterprise Applications: Enterprise Rollout Framework for Modern Businesses
Query Optimization For Enterprise Applications: Executive Decision Framework for Modern Businesses
Query Optimization For Enterprise Applications: Failure Patterns and Recovery for Modern Businesses
Query Optimization For Enterprise Applications: Implementation Blueprint for Modern Businesses
Query Optimization For Enterprise Applications: Integration Readiness Guide for Modern Businesses
Query Optimization For Enterprise Applications: KPI and Reporting Architecture for Modern Businesses
Query Optimization For Enterprise Applications: Leadership FAQ Guide for Modern Businesses
Query Optimization For Enterprise Applications: Product-Led Growth Lens for Modern Businesses
Query Optimization For Enterprise Applications: Risk Mitigation Playbook for Modern Businesses
Query Optimization For Enterprise Applications: Scalability Strategy for Modern Businesses
Query Optimization For Enterprise Applications: Security and Governance Model for Modern Businesses
Query Optimization For Enterprise Applications: Vendor Evaluation Checklist for Modern Businesses
Rapid Prototype To Mvp Development: 90-Day Execution Plan for Modern Businesses
Rapid Prototype To Mvp Development: Build vs Buy Analysis for Modern Businesses
Rapid Prototype To Mvp Development: Change Management Strategy for Modern Businesses
Rapid Prototype To Mvp Development: Cost, Timeline, and ROI Playbook for Modern Businesses
Rapid Prototype To Mvp Development: Enterprise Rollout Framework for Modern Businesses
Rapid Prototype To Mvp Development: Executive Decision Framework for Modern Businesses
Rapid Prototype To Mvp Development: Failure Patterns and Recovery for Modern Businesses
Rapid Prototype To Mvp Development: Implementation Blueprint for Modern Businesses
Rapid Prototype To Mvp Development: Integration Readiness Guide for Modern Businesses
Rapid Prototype To Mvp Development: KPI and Reporting Architecture for Modern Businesses
Rapid Prototype To Mvp Development: Leadership FAQ Guide for Modern Businesses
Rapid Prototype To Mvp Development: Product-Led Growth Lens for Modern Businesses
Rapid Prototype To Mvp Development: Risk Mitigation Playbook for Modern Businesses
Rapid Prototype To Mvp Development: Scalability Strategy for Modern Businesses
Rapid Prototype To Mvp Development: Security and Governance Model for Modern Businesses
Rapid Prototype To Mvp Development: Vendor Evaluation Checklist for Modern Businesses
Rename Database: Strategic Playbook for Modern Businesses
Rename Table: Strategic Playbook for Modern Businesses
Sql Right Join: Strategic Playbook for Modern Businesses
Saas Architecture Consulting For Startups: 90-Day Execution Plan for Modern Businesses
Saas Architecture Consulting For Startups: Build vs Buy Analysis for Modern Businesses
Saas Architecture Consulting For Startups: Change Management Strategy for Modern Businesses
Saas Architecture Consulting For Startups: Cost, Timeline, and ROI Playbook for Modern Businesses
Saas Architecture Consulting For Startups: Enterprise Rollout Framework for Modern Businesses
Saas Architecture Consulting For Startups: Executive Decision Framework for Modern Businesses
Saas Architecture Consulting For Startups: Failure Patterns and Recovery for Modern Businesses
Saas Architecture Consulting For Startups: Implementation Blueprint for Modern Businesses
Saas Architecture Consulting For Startups: Integration Readiness Guide for Modern Businesses
Saas Architecture Consulting For Startups: KPI and Reporting Architecture for Modern Businesses
Saas Architecture Consulting For Startups: Leadership FAQ Guide for Modern Businesses
Saas Architecture Consulting For Startups: Product-Led Growth Lens for Modern Businesses
Saas Architecture Consulting For Startups: Risk Mitigation Playbook for Modern Businesses
Saas Architecture Consulting For Startups: Scalability Strategy for Modern Businesses
Saas Architecture Consulting For Startups: Security and Governance Model for Modern Businesses
Saas Architecture Consulting For Startups: Vendor Evaluation Checklist for Modern Businesses
Saas Product Development Services: 90-Day Execution Plan for Modern Businesses
Saas Product Development Services: 90-Day Execution Plan for Modern Businesses
Saas Product Development Services: Build vs Buy Analysis for Modern Businesses
Saas Product Development Services: Build vs Buy Analysis for Modern Businesses
Saas Product Development Services: Strategic Playbook for Modern Businesses
Saas Product Development Services: Change Management Strategy for Modern Businesses
Saas Product Development Services: Change Management Strategy for Modern Businesses
Saas Product Development Services: Strategic Playbook for Modern Businesses
Saas Product Development Services: Strategic Playbook for Modern Businesses
Saas Product Development Services: Cost, Timeline, and ROI Playbook for Modern Businesses
Saas Product Development Services: Cost, Timeline, and ROI Playbook for Modern Businesses
Saas Product Development Services: Enterprise Rollout Framework for Modern Businesses
Saas Product Development Services: Enterprise Rollout Framework for Modern Businesses
Saas Product Development Services: Strategic Playbook for Modern Businesses
Saas Product Development Services: Executive Decision Framework for Modern Businesses
Saas Product Development Services: Executive Decision Framework for Modern Businesses
Saas Product Development Services: Failure Patterns and Recovery for Modern Businesses
Saas Product Development Services: Failure Patterns and Recovery for Modern Businesses
Saas Product Development Services: Strategic Playbook for Modern Businesses
Saas Product Development Services: Implementation Blueprint for Modern Businesses
Saas Product Development Services: Implementation Blueprint for Modern Businesses
Saas Product Development Services: Strategic Playbook for Modern Businesses
Saas Product Development Services: Integration Readiness Guide for Modern Businesses
Saas Product Development Services: Integration Readiness Guide for Modern Businesses
Saas Product Development Services: KPI and Reporting Architecture for Modern Businesses
Saas Product Development Services: KPI and Reporting Architecture for Modern Businesses
Saas Product Development Services: Strategic Playbook for Modern Businesses
Saas Product Development Services: Leadership FAQ Guide for Modern Businesses
Saas Product Development Services: Leadership FAQ Guide for Modern Businesses
Saas Product Development Services: Product-Led Growth Lens for Modern Businesses
Saas Product Development Services: Product-Led Growth Lens for Modern Businesses
Saas Product Development Services: Risk Mitigation Playbook for Modern Businesses
Saas Product Development Services: Scalability Strategy for Modern Businesses
Saas Product Development Services: Scalability Strategy for Modern Businesses
Saas Product Development Services: Strategic Playbook for Modern Businesses
Saas Product Development Services: Strategic Playbook for Modern Businesses
Saas Product Development Services: Security and Governance Model for Modern Businesses
Saas Product Development Services: Security and Governance Model for Modern Businesses
Saas Product Development Services: Strategic Playbook for Modern Businesses
Saas Product Development Services: Vendor Evaluation Checklist for Modern Businesses
Saas Product Development Services: Vendor Evaluation Checklist for Modern Businesses
Saas Product Engineering Company: 90-Day Execution Plan for Modern Businesses
Saas Product Engineering Company: Build vs Buy Analysis for Modern Businesses
Saas Product Engineering Company: Change Management Strategy for Modern Businesses
Saas Product Engineering Company: Cost, Timeline, and ROI Playbook for Modern Businesses
Saas Product Engineering Company: Enterprise Rollout Framework for Modern Businesses
Saas Product Engineering Company: Executive Decision Framework for Modern Businesses
Saas Product Engineering Company: Failure Patterns and Recovery for Modern Businesses
Saas Product Engineering Company: Implementation Blueprint for Modern Businesses
Saas Product Engineering Company: Integration Readiness Guide for Modern Businesses
Saas Product Engineering Company: KPI and Reporting Architecture for Modern Businesses
Saas Product Engineering Company: Leadership FAQ Guide for Modern Businesses
Saas Product Engineering Company: Product-Led Growth Lens for Modern Businesses
Saas Product Engineering Company: Risk Mitigation Playbook for Modern Businesses
Saas Product Engineering Company: Scalability Strategy for Modern Businesses
Saas Product Engineering Company: Security and Governance Model for Modern Businesses
Saas Product Engineering Company: Vendor Evaluation Checklist for Modern Businesses
Scalable Digital Platforms: Strategic Playbook for Modern Businesses
Scalable Digital Platforms: Strategic Playbook for Modern Businesses
Scalable Digital Platforms: Strategic Playbook for Modern Businesses
Scalable Digital Platforms: Strategic Playbook for Modern Businesses
Scalable Digital Platforms: Strategic Playbook for Modern Businesses
Scalable Digital Platforms: Strategic Playbook for Modern Businesses
Scalable Digital Platforms: Strategic Playbook for Modern Businesses
Scalable Digital Platforms: Strategic Playbook for Modern Businesses
Scalable Digital Platforms: Strategic Playbook for Modern Businesses
Scalable Digital Platforms: Strategic Playbook for Modern Businesses
Scalable Web Application Architecture: 90-Day Execution Plan for Modern Businesses
Scalable Web Application Architecture: Build vs Buy Analysis for Modern Businesses
Scalable Web Application Architecture: Change Management Strategy for Modern Businesses
Scalable Web Application Architecture: Cost, Timeline, and ROI Playbook for Modern Businesses
Scalable Web Application Architecture: Enterprise Rollout Framework for Modern Businesses
Scalable Web Application Architecture: Executive Decision Framework for Modern Businesses
Scalable Web Application Architecture: Failure Patterns and Recovery for Modern Businesses
Scalable Web Application Architecture: Implementation Blueprint for Modern Businesses
Scalable Web Application Architecture: Integration Readiness Guide for Modern Businesses
Scalable Web Application Architecture: KPI and Reporting Architecture for Modern Businesses
Scalable Web Application Architecture: Leadership FAQ Guide for Modern Businesses
Scalable Web Application Architecture: Product-Led Growth Lens for Modern Businesses
Scalable Web Application Architecture: Risk Mitigation Playbook for Modern Businesses
Scalable Web Application Architecture: Scalability Strategy for Modern Businesses
Scalable Web Application Architecture: Security and Governance Model for Modern Businesses
Scalable Web Application Architecture: Vendor Evaluation Checklist for Modern Businesses
Secure Enterprise Web Portal Development: 90-Day Execution Plan for Modern Businesses
Secure Enterprise Web Portal Development: Build vs Buy Analysis for Modern Businesses
Secure Enterprise Web Portal Development: Change Management Strategy for Modern Businesses
Secure Enterprise Web Portal Development: Cost, Timeline, and ROI Playbook for Modern Businesses
Secure Enterprise Web Portal Development: Enterprise Rollout Framework for Modern Businesses
Secure Enterprise Web Portal Development: Executive Decision Framework for Modern Businesses
Secure Enterprise Web Portal Development: Failure Patterns and Recovery for Modern Businesses
Secure Enterprise Web Portal Development: Implementation Blueprint for Modern Businesses
Secure Enterprise Web Portal Development: Integration Readiness Guide for Modern Businesses
Secure Enterprise Web Portal Development: KPI and Reporting Architecture for Modern Businesses
Secure Enterprise Web Portal Development: Leadership FAQ Guide for Modern Businesses
Secure Enterprise Web Portal Development: Product-Led Growth Lens for Modern Businesses
Secure Enterprise Web Portal Development: Risk Mitigation Playbook for Modern Businesses
Secure Enterprise Web Portal Development: Scalability Strategy for Modern Businesses
Secure Enterprise Web Portal Development: Security and Governance Model for Modern Businesses
Secure Enterprise Web Portal Development: Vendor Evaluation Checklist for Modern Businesses
Select Database: Strategic Playbook for Modern Businesses
Select Table: Strategic Playbook for Modern Businesses
Sql Self Join: Strategic Playbook for Modern Businesses
Sql Aliases: Strategic Playbook for Modern Businesses
Sql Arithmetic Operators: Strategic Playbook for Modern Businesses
Sql Built-in Functions: Strategic Playbook for Modern Businesses
Case Statement: Strategic Playbook for Modern Businesses
Cast Function: Strategic Playbook for Modern Businesses
Charindex Function: Strategic Playbook for Modern Businesses
Choose Function: Strategic Playbook for Modern Businesses
Sql Clauses: Strategic Playbook for Modern Businesses
Coalesce Function: Strategic Playbook for Modern Businesses
Sql Commands: Strategic Playbook for Modern Businesses
Sql Comments: Strategic Playbook for Modern Businesses
Sql Comparison Operators: Strategic Playbook for Modern Businesses
Concat Function: Strategic Playbook for Modern Businesses
Sql Constraints: Strategic Playbook for Modern Businesses
Convert Function: Strategic Playbook for Modern Businesses
Sql Cte: Strategic Playbook for Modern Businesses
Sql Data Types: Strategic Playbook for Modern Businesses
Sql Database: Strategic Playbook for Modern Businesses
Dateadd Function: Strategic Playbook for Modern Businesses
Datediff Function: Strategic Playbook for Modern Businesses
Datepart Function: Strategic Playbook for Modern Businesses
Denserank Function: Strategic Playbook for Modern Businesses
Distinct Clause: Strategic Playbook for Modern Businesses
From Clause: Strategic Playbook for Modern Businesses
Sql Functions: Strategic Playbook for Modern Businesses
Getdate Function: Strategic Playbook for Modern Businesses
Group By Clause: Strategic Playbook for Modern Businesses
Having Clause: Strategic Playbook for Modern Businesses
Iif Function: Strategic Playbook for Modern Businesses
Isnull Function: Strategic Playbook for Modern Businesses
Sql Joins: Strategic Playbook for Modern Businesses
Join Clause: Strategic Playbook for Modern Businesses
Len Function: Strategic Playbook for Modern Businesses
Sql Logical Operators: Strategic Playbook for Modern Businesses
Sql Merge: Strategic Playbook for Modern Businesses
Nullif Function: Strategic Playbook for Modern Businesses
Sql Operators: Strategic Playbook for Modern Businesses
Order By Clause: Strategic Playbook for Modern Businesses
Sql Performance Optimization Services: 90-Day Execution Plan for Modern Businesses
Sql Performance Optimization Services: 90-Day Execution Plan for Modern Businesses
Sql Performance Optimization Services: Build vs Buy Analysis for Modern Businesses
Sql Performance Optimization Services: Build vs Buy Analysis for Modern Businesses
Sql Performance Optimization Services: Change Management Strategy for Modern Businesses
Sql Performance Optimization Services: Change Management Strategy for Modern Businesses
Sql Performance Optimization Services: Cost, Timeline, and ROI Playbook for Modern Businesses
Sql Performance Optimization Services: Cost, Timeline, and ROI Playbook for Modern Businesses
Sql Performance Optimization Services: Enterprise Rollout Framework for Modern Businesses
Sql Performance Optimization Services: Enterprise Rollout Framework for Modern Businesses
Sql Performance Optimization Services: Executive Decision Framework for Modern Businesses
Sql Performance Optimization Services: Executive Decision Framework for Modern Businesses
Sql Performance Optimization Services: Failure Patterns and Recovery for Modern Businesses
Sql Performance Optimization Services: Failure Patterns and Recovery for Modern Businesses
Sql Performance Optimization Services: Implementation Blueprint for Modern Businesses
Sql Performance Optimization Services: Implementation Blueprint for Modern Businesses
Sql Performance Optimization Services: Integration Readiness Guide for Modern Businesses
Sql Performance Optimization Services: Integration Readiness Guide for Modern Businesses
Sql Performance Optimization Services: KPI and Reporting Architecture for Modern Businesses
Sql Performance Optimization Services: KPI and Reporting Architecture for Modern Businesses
Sql Performance Optimization Services: Leadership FAQ Guide for Modern Businesses
Sql Performance Optimization Services: Leadership FAQ Guide for Modern Businesses
Sql Performance Optimization Services: Product-Led Growth Lens for Modern Businesses
Sql Performance Optimization Services: Product-Led Growth Lens for Modern Businesses
Sql Performance Optimization Services: Risk Mitigation Playbook for Modern Businesses
Sql Performance Optimization Services: Scalability Strategy for Modern Businesses
Sql Performance Optimization Services: Scalability Strategy for Modern Businesses
Sql Performance Optimization Services: Security and Governance Model for Modern Businesses
Sql Performance Optimization Services: Security and Governance Model for Modern Businesses
Sql Performance Optimization Services: Vendor Evaluation Checklist for Modern Businesses
Sql Performance Optimization Services: Vendor Evaluation Checklist for Modern Businesses
Rank Function: Strategic Playbook for Modern Businesses
Replace Function: Strategic Playbook for Modern Businesses
Rownumber Function: Strategic Playbook for Modern Businesses
Select Clause: Strategic Playbook for Modern Businesses
Sql Server Management Studio: Strategic Playbook for Modern Businesses
Sql Subquery: Strategic Playbook for Modern Businesses
Substring Function: Strategic Playbook for Modern Businesses
Sql Tables: Strategic Playbook for Modern Businesses
Temp Table: Strategic Playbook for Modern Businesses
Top Clause: Strategic Playbook for Modern Businesses
Trycast Function: Strategic Playbook for Modern Businesses
Tryconvert Function: Strategic Playbook for Modern Businesses
Union Clause: Strategic Playbook for Modern Businesses
Union All Clause: Strategic Playbook for Modern Businesses
Sql Variables: Strategic Playbook for Modern Businesses
Sql Views: Strategic Playbook for Modern Businesses
Where Clause: Strategic Playbook for Modern Businesses
Sql Window Functions: Strategic Playbook for Modern Businesses
Sql With Ties: Strategic Playbook for Modern Businesses
Startup Mvp Development Company: 90-Day Execution Plan for Modern Businesses
Startup Mvp Development Company: 90-Day Execution Plan for Modern Businesses
Startup Mvp Development Company Architecture Due Diligence: Strategic Playbook for Modern Businesses
Startup Mvp Development Company: Build vs Buy Analysis for Modern Businesses
Startup Mvp Development Company: Build vs Buy Analysis for Modern Businesses
Startup Mvp Development Company: Change Management Strategy for Modern Businesses
Startup Mvp Development Company: Change Management Strategy for Modern Businesses
Startup Mvp Development Company: Cost, Timeline, and ROI Playbook for Modern Businesses
Startup Mvp Development Company: Cost, Timeline, and ROI Playbook for Modern Businesses
Startup Mvp Development Company: Enterprise Rollout Framework for Modern Businesses
Startup Mvp Development Company: Enterprise Rollout Framework for Modern Businesses
Startup Mvp Development Company: Executive Decision Framework for Modern Businesses
Startup Mvp Development Company: Executive Decision Framework for Modern Businesses
Startup Mvp Development Company: Failure Patterns and Recovery for Modern Businesses
Startup Mvp Development Company: Failure Patterns and Recovery for Modern Businesses
Startup Mvp Development Company: Implementation Blueprint for Modern Businesses
Startup Mvp Development Company: Implementation Blueprint for Modern Businesses
Startup Mvp Development Company: Integration Readiness Guide for Modern Businesses
Startup Mvp Development Company: Integration Readiness Guide for Modern Businesses
Startup Mvp Development Company: KPI and Reporting Architecture for Modern Businesses
Startup Mvp Development Company: KPI and Reporting Architecture for Modern Businesses
Startup Mvp Development Company: Leadership FAQ Guide for Modern Businesses
Startup Mvp Development Company: Leadership FAQ Guide for Modern Businesses
Startup Mvp Development Company Procurement Strategy Brief: Strategic Playbook for Modern Businesses
Startup Mvp Development Company: Product-Led Growth Lens for Modern Businesses
Startup Mvp Development Company: Product-Led Growth Lens for Modern Businesses
Startup Mvp Development Company: Risk Mitigation Playbook for Modern Businesses
Startup Mvp Development Company: Scalability Strategy for Modern Businesses
Startup Mvp Development Company: Scalability Strategy for Modern Businesses
Startup Mvp Development Company: Security and Governance Model for Modern Businesses
Startup Mvp Development Company: Security and Governance Model for Modern Businesses
Startup Mvp Development Company: Vendor Evaluation Checklist for Modern Businesses
Startup Mvp Development Company: Vendor Evaluation Checklist for Modern Businesses
Startup Mvp Development Services: Strategic Playbook for Modern Businesses
Startup Mvp Development Services: Strategic Playbook for Modern Businesses
Startup Mvp Development Services: Strategic Playbook for Modern Businesses
Startup Mvp Development Services: Strategic Playbook for Modern Businesses
Startup Mvp Development Services: Strategic Playbook for Modern Businesses
Startup Mvp Development Services: Strategic Playbook for Modern Businesses
Startup Mvp Development Services: Strategic Playbook for Modern Businesses
Startup Mvp Development Services: Strategic Playbook for Modern Businesses
Startup Mvp Development Services: Strategic Playbook for Modern Businesses
Startup Mvp Development Services: Strategic Playbook for Modern Businesses
Startup Product Development Services: 90-Day Execution Plan for Modern Businesses
Startup Product Development Services: Build vs Buy Analysis for Modern Businesses
Startup Product Development Services: Change Management Strategy for Modern Businesses
Startup Product Development Services: Cost, Timeline, and ROI Playbook for Modern Businesses
Startup Product Development Services: Enterprise Rollout Framework for Modern Businesses
Startup Product Development Services: Executive Decision Framework for Modern Businesses
Startup Product Development Services: Failure Patterns and Recovery for Modern Businesses
Startup Product Development Services: Implementation Blueprint for Modern Businesses
Startup Product Development Services: Integration Readiness Guide for Modern Businesses
Startup Product Development Services: KPI and Reporting Architecture for Modern Businesses
Startup Product Development Services: Leadership FAQ Guide for Modern Businesses
Startup Product Development Services: Product-Led Growth Lens for Modern Businesses
Startup Product Development Services: Risk Mitigation Playbook for Modern Businesses
Startup Product Development Services: Scalability Strategy for Modern Businesses
Startup Product Development Services: Security and Governance Model for Modern Businesses
Startup Product Development Services: Vendor Evaluation Checklist for Modern Businesses
Sql Store Procedure: Strategic Playbook for Modern Businesses
Subscription Platform Development Services: 90-Day Execution Plan for Modern Businesses
Subscription Platform Development Services: Build vs Buy Analysis for Modern Businesses
Subscription Platform Development Services: Change Management Strategy for Modern Businesses
Subscription Platform Development Services: Cost, Timeline, and ROI Playbook for Modern Businesses
Subscription Platform Development Services: Enterprise Rollout Framework for Modern Businesses
Subscription Platform Development Services: Executive Decision Framework for Modern Businesses
Subscription Platform Development Services: Failure Patterns and Recovery for Modern Businesses
Subscription Platform Development Services: Implementation Blueprint for Modern Businesses
Subscription Platform Development Services: Integration Readiness Guide for Modern Businesses
Subscription Platform Development Services: KPI and Reporting Architecture for Modern Businesses
Subscription Platform Development Services: Leadership FAQ Guide for Modern Businesses
Subscription Platform Development Services: Product-Led Growth Lens for Modern Businesses
Subscription Platform Development Services: Risk Mitigation Playbook for Modern Businesses
Subscription Platform Development Services: Scalability Strategy for Modern Businesses
Subscription Platform Development Services: Security and Governance Model for Modern Businesses
Subscription Platform Development Services: Vendor Evaluation Checklist for Modern Businesses
Truncate Table: Strategic Playbook for Modern Businesses
Sql Error Handling: Strategic Playbook for Modern Businesses
Types Of Triggers In Dbms: Strategic Playbook for Modern Businesses
Union All Operator: Strategic Playbook for Modern Businesses
Union Operator: Strategic Playbook for Modern Businesses